
The first step in any effective dry rot repair is knowing what you're looking for. Before you can even think about fixing the problem, you need to become a bit of a detective, spotting the subtle warning signs that fungus is at work. This is especially true here in the Pacific Northwest, where the damp climate from Seattle to Portland gives it a perfect place to thrive.
It’s all about learning to trust your senses—what you see, what you feel, and even what you smell—to catch the issue before it turns into a major headache for your home's siding and structure.
Identifying the First Signs of Dry Rot
Catching dry rot early is rarely about finding giant, gaping holes. It's usually much sneakier than that. You're looking for small, unusual changes on your home's exterior. The fungus responsible, Serpula lacrymans, can cause a surprising amount of damage behind a coat of paint that looks perfectly fine from a distance.
Think of it this way: your first clue often isn't something you see, but something you smell. If you notice a persistent, musty, or mushroom-like odor near windows, doors, or downspouts, that's a classic sign. It means moisture is trapped, and fungus is starting to grow. This smell is especially common in those sheltered, damp spots you see on so many homes around the Puget Sound.
Probing for Weakness
Next, it's time to get hands-on. Don't just glance at the wood; you need to physically check it. Grab a screwdriver or even just use your thumb to gently press on siding and trim, especially in those areas you're suspicious of.
- Healthy wood feels solid. It will give you firm resistance.
- Rotted wood will feel spongy, soft, or even brittle. If your tool sinks right in with almost no effort, you’ve found a problem.
Really focus your attention on joints, corners, and the bottom edges of siding boards—these are the prime spots where water loves to sit. A window sill that looks totally normal but feels soft to the touch is a massive red flag.
A little secret from the field: Always pay extra attention to the areas right below a leaky gutter or where bushes and landscaping are growing too close to the house. These spots create the perfect little microclimate for dry rot to get started, often where you can't easily see it. We often find the worst damage hiding behind overgrown rhododendrons on the north side of a house.
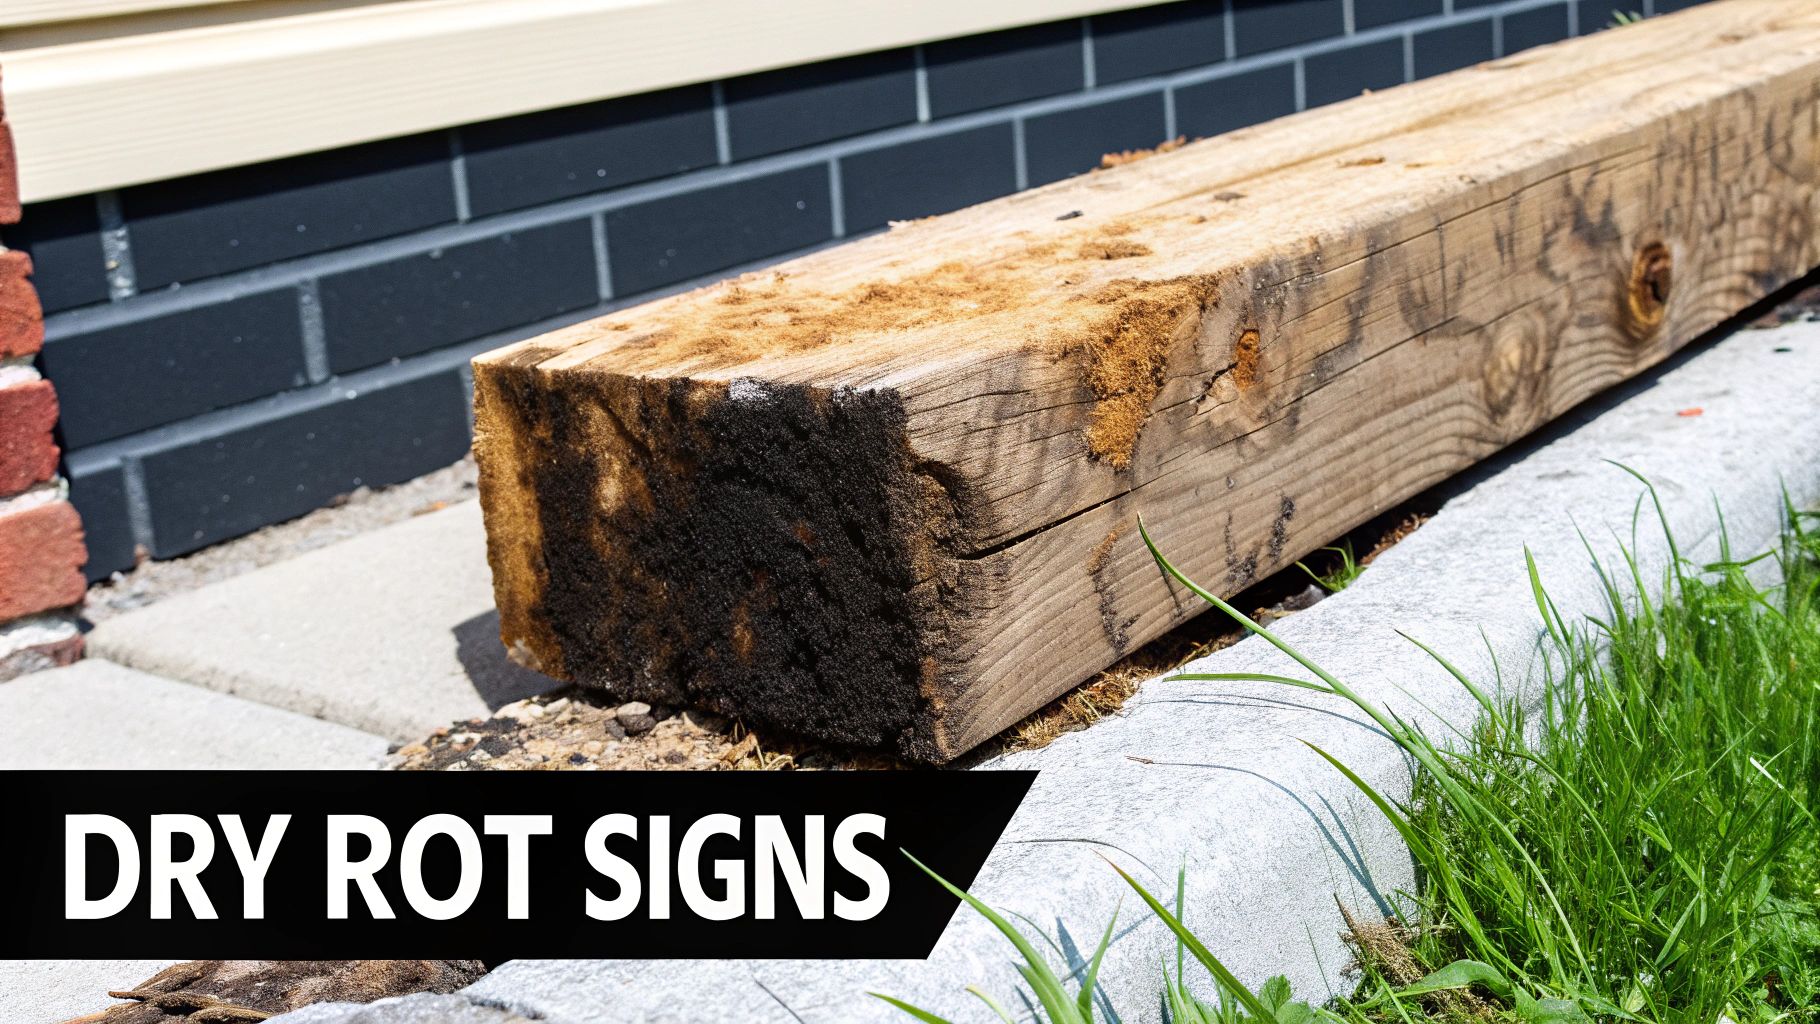
The Telltale Cracks and Color Changes
When dry rot gets more advanced, it has a very distinct look. The most obvious sign is something called cuboidal fracture. This is when the wood shrinks and cracks into small, cube-like patterns, almost like a piece of burnt wood. If you see that deep, blocky cracking, it’s a dead giveaway.
You should also keep an eye out for any discoloration. Wood that's been affected by dry rot often looks darker than the healthy wood around it, sometimes turning a deep brown or even black. You might also spot paint that's peeling, blistering, or cracking for no apparent reason. That's a sign that moisture is trapped underneath, literally pushing the paint off the surface from the inside out.
By recognizing these early clues, you can jump on the dry rot repair before a tiny patch becomes a huge, expensive structural problem.
Gathering Your Dry Rot Repair Toolkit
Walking into a hardware store blind is a recipe for a half-finished project. If you want your dry rot repair to last more than a single season, you have to start with the right gear. This isn't just about patching a hole; it's about making sure the problem doesn't come roaring back.
The Must-Have Tools for the Job
Before you even think about fillers and hardeners, you need the basic tools to safely dig out the rot and prep the area. Think of this as the surgical phase.
- Sharp Wood Chisel: Absolutely essential. This lets you carefully carve away the bad wood without tearing up the good stuff around it.
- Sturdy Pry Bar: When you hit a section of trim or siding that's just too far gone, this is what you'll need to pull it off cleanly.
- Wire Brush: After you've chiseled out the soft, punky wood, a wire brush is perfect for scrubbing away any lingering debris and fungal growth.
- Safety Glasses and Gloves: Don't even start without these. Between wood dust, splinters, and the chemicals you'll be using, protecting yourself is non-negotiable.
Choosing Your Repair Materials
With your basic tools ready, it's time for the products that actually perform the repair. This is where so many DIY fixes fail. You can't just slap some wood putty in the hole and call it a day.
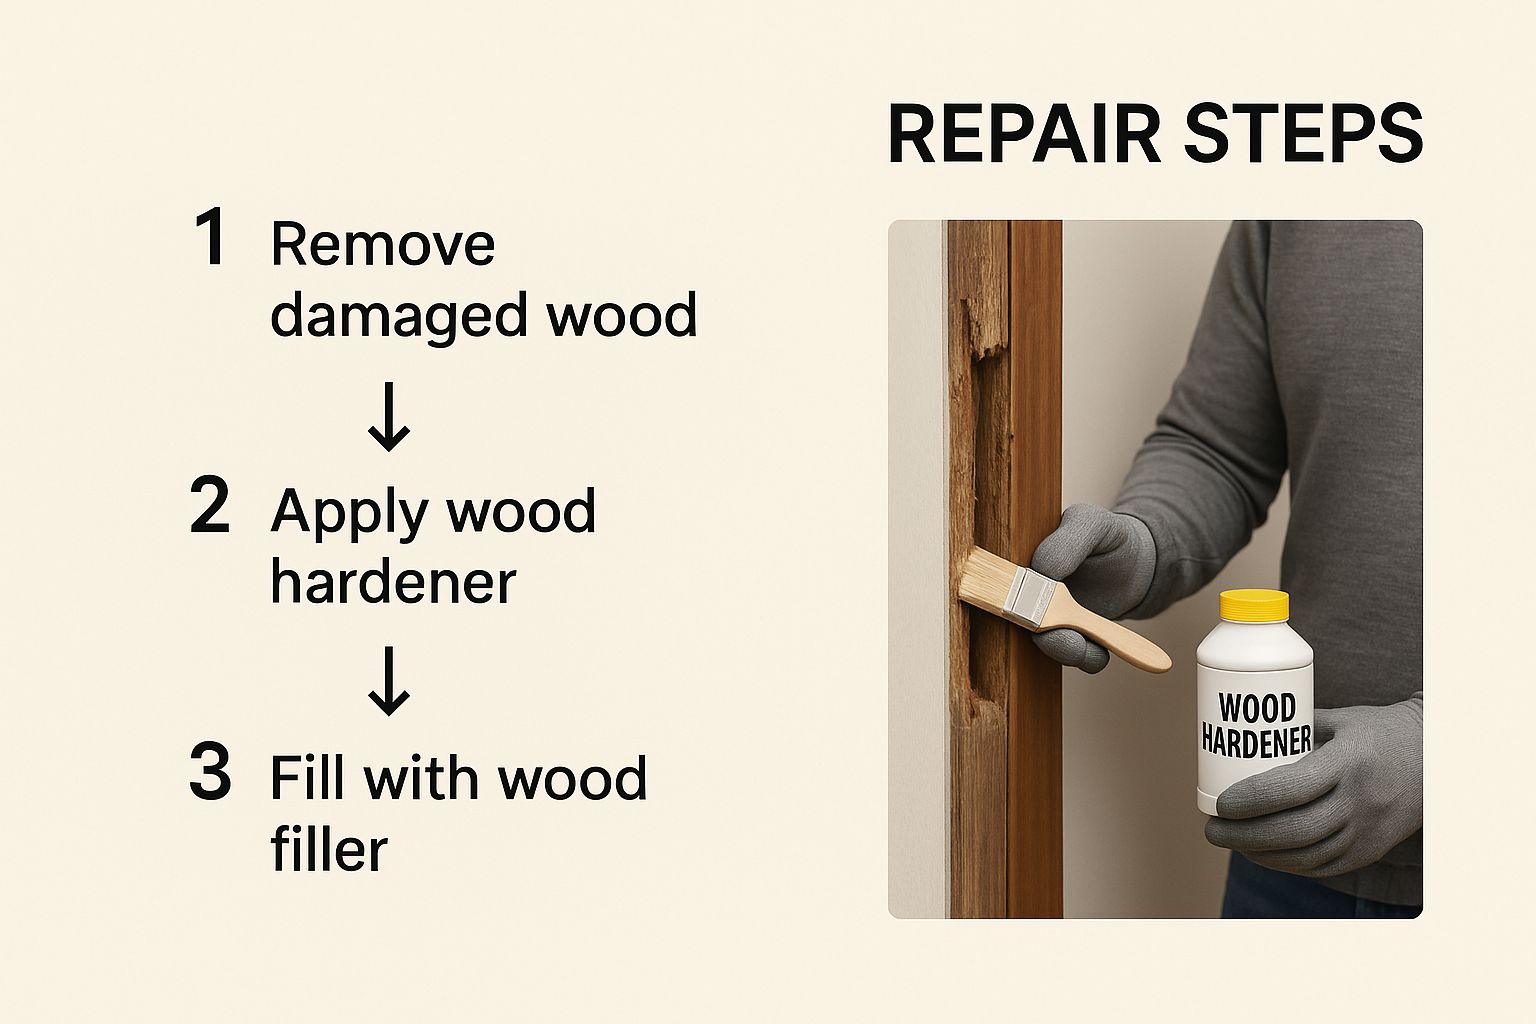
A real, professional-grade repair uses a two-part system: a consolidant (or hardener) and an epoxy filler.
First up is a liquid wood hardener. This stuff is a thin, watery liquid that's designed to soak deep into the wood fibers that are still there but have been weakened by the rot. It basically turns that spongy wood back into a solid, stable base for your filler.
Next comes the two-part epoxy filler. This is the workhorse of the entire repair. Unlike standard wood putty, which can shrink and crack, a good epoxy cures into a structural, rock-hard material. You can sand it, drill it, and paint it just like real wood. It's no wonder the market for these products is booming—the global wood repair epoxy market was valued at around USD 395.9 million in 2023 and is only expected to grow. Professionals rely on epoxy because it works. For a deeper dive, you can explore the data on wood repair epoxy market trends.
Here’s a pro tip: Always slightly overfill the cavity with the epoxy. This gives you extra material to sand down, making it much easier to get a perfectly smooth, flush surface that blends right into the existing trim or siding. Once it’s cured and sanded, a coat of high-quality exterior primer and paint will seal the deal, protecting your repair from the weather for years to come.
Excavating and Treating the Affected Wood
Now for the main event. With your tools laid out, you've reached the most critical part of the entire repair: surgically removing the diseased wood and killing the fungus for good. This isn't about speed; it's about being deliberate and thorough to make sure this problem doesn't come back to haunt you.
First, you need to start excavating all the soft, compromised wood. Grab a sharp wood chisel or a multi-tool with a cutting blade and begin carving away the dark, crumbly sections. You'll immediately feel the difference as your tool goes from the spongy, rotten wood into solid, healthy timber.
The One-Inch Rule: A Professional Secret
As you dig out the decay, you have to be aggressive. One of the most common mistakes I see DIYers make is only removing the wood that looks rotten. But here's the thing: fungal strands, known as hyphae, creep invisibly into the surrounding wood, just waiting for the right conditions to start growing again.
To stop this from happening, you must follow the one-inch rule. This is a non-negotiable standard in the industry. It means you have to cut back at least one full inch into the healthy, solid wood beyond the very last visible sign of rot. This simple step creates a clean, fungus-free border and is arguably the single most important part of a permanent dry rot repair.
Once you've carved out a clean cavity, take a wire brush and give the entire exposed surface a good scrub. You want to get rid of any lingering loose fibers or dust. Follow up with a vacuum to get it perfectly clean. The goal is to have the wood preservative soak directly into clean wood, not a layer of debris.
To help you keep track, here's a quick summary of the repair process stages. This table breaks down the goal for each step and what actions you need to take.
Dry Rot Repair Stages and Key Actions
| Stage | Primary Goal | Essential Actions |
|---|---|---|
| Excavation | Remove all infected and compromised wood | Cut out all visible rot plus an additional 1-inch border into healthy wood. |
| Cleaning | Prepare the surface for treatment | Scrub the cavity with a wire brush and vacuum thoroughly to remove all dust and debris. |
| Treatment | Neutralize any remaining fungal spores | Liberally apply a borate-based wood preservative to all exposed wood surfaces. |
| Drying | Ensure the preservative is fully cured | Allow the treated area to dry completely as per the product's instructions before filling. |
Following these stages in order is your best bet for a repair that truly lasts.
Applying a Borate-Based Wood Preservative
With the cavity prepped, it's time to apply your insurance policy against future rot. We always recommend using a borate-based wood preservative. Borates are incredibly effective fungicides that soak deep into the wood fibers, killing off any sneaky fungal spores and making the wood inedible to new infections.
Using a paintbrush, apply the liquid preservative generously. You want to saturate every nook and cranny inside the cavity—don't be shy here. The wood should look visibly wet. Let it soak in for a bit, then hit it with a second coat just to be absolutely sure you've gotten full penetration.
Proper ventilation isn't just a suggestion; it's a must. Make sure you're working in an open area and wear your safety gear, including gloves and safety glasses. Let the treated area dry completely according to the manufacturer's instructions. In our classic Puget Sound climate, this can take anywhere from a few hours to a full day.
Whatever you do, don't rush the drying stage. Slapping wood filler over a damp, treated area will trap moisture, ruin the bond, and completely undermine all your hard work. Once that preservative is fully cured, you'll have a solid, sterile foundation, perfectly prepped for rebuilding.
Rebuilding and Restoring Damaged Siding
Now that you've cut out the rot and treated the area, you're looking at a clean slate. This is where the real craftsmanship begins, turning that empty space into a repair so good, no one will ever know it was there. This isn't just about filling a hole—it's about restoring the strength and look of your home's exterior.
The very first thing to do is apply a liquid wood hardener to the prepped, dry surface. This stuff is a game-changer. It soaks into the wood fibers around the repair, solidifies them, and creates a rock-solid foundation for what comes next. It’s a crucial step to make sure your epoxy filler bonds permanently and doesn't pull away down the road.
Mastering Epoxy for a Flawless Finish
With the hardener fully cured, it’s time for the two-part epoxy filler. Professionals swear by this stuff for a reason: it doesn't shrink, crack, or absorb water like those common wood putties you see at the hardware store. It essentially becomes a new, structural part of the wood.
Mixing the epoxy feels a bit like a science experiment. You’ll combine two parts—a resin and a hardener—on a scrap piece of wood or cardboard. Use a putty knife to mix them together thoroughly until you get a single, uniform color. The moment you do, the clock starts ticking. You've probably got about 15-20 minutes of working time before it begins to set.

Press the mixed epoxy firmly into the cavity. Here's a pro tip: always overfill it just a little. Having that extra material gives you something to work with, allowing you to sand it down perfectly flush with the surrounding siding. That’s how you get a truly seamless transition.
Knowing When to Replace Instead of Repair
Epoxy is fantastic, but it can't solve everything. It's the perfect solution for minor-to-moderate rot in non-structural areas, like window trim or small patches on a siding board. But sometimes, a full replacement is the only smart, safe option.
If the dry rot has eaten through more than 50% of a board's width, or if you're seeing widespread damage across multiple panels, it's time to cut it out and start fresh. Trying to fill a massive void with epoxy is not only a ton of work, but it can also compromise your home’s first line of defense against the weather.
When you do have to replace a section, make sure you use new, pressure-treated lumber that's been primed on all six sides before you install it. This trade best practice of "back-priming" gives you maximum protection right from the start. The goal is to make the new piece blend in so perfectly with the old that it completely disappears after a fresh coat of paint.
The demand for these types of robust repair solutions is growing because they work. In fact, the market for structural wood repair epoxies—the very products used for serious dry rot—is projected to hit around $286.3 million globally by 2030.
Long-Term Prevention and Siding Replacement

Fixing a spot of dry rot feels good, but it’s only a temporary win. The real victory comes when you stop it from ever coming back.
To do that, you have to think like a moisture detective. Your job is to find and eliminate the conditions that let the rot grow in the first place. This isn't just about slapping on some wood hardener and calling it a day—it's about creating an environment where fungus can't survive.
Modern approaches to dry rot have shifted away from just using harsh chemicals. The smarter, more sustainable method is all about controlling the environment by cutting off the moisture supply. It's simpler, cheaper, and far more effective in the long run.
Pinpointing Moisture Intrusion Hotspots
Moisture is the lifeblood of dry rot, and it’s surprisingly good at finding ways into your home. Focusing on these common entry points is your best bet for long-term prevention.
Here’s where to start your investigation:
- Clogged Gutters: When your gutters back up, they dump water right down your siding. This constant saturation turns your trim and siding into a perfect home for rot.
- Failed Flashing: Look closely at the metal flashing around your windows and doors. If it’s bent, missing, or installed poorly, it’s like leaving a door wide open for water to sneak in behind the siding. You can see examples of properly installed window elements that are designed to keep that moisture out.
- Overgrown Landscaping: Bushes, vines, and trees pressed up against your house trap dampness and prevent air from circulating. This keeps your siding perpetually damp—exactly what dry rot loves.
When Siding Replacement Is the Smartest Move
If you're dealing with a small, isolated patch of decay, an epoxy repair can be a perfectly fine solution. But what if you're patching up the same corners every year? Or if the rot seems to be popping up all over?
At that point, you're not just fixing a problem; you're fighting a losing battle. It’s time to think bigger and consider a full siding replacement.
A full siding replacement isn't just an expense—it's a permanent solution. You're not just covering up the problem; you're tearing out all the compromised material, getting rid of hidden rot, and upgrading to modern materials built for decades of protection.
Here in the damp Puget Sound climate, you need siding that can stand up to the weather. Materials like fiber cement or treated engineered wood are built to resist moisture, effectively starving dry rot of its food source. The key benefits are clear:
- Durability: Modern materials are engineered to withstand the Pacific Northwest's wet seasons without rotting, warping, or swelling.
- Low Maintenance: Unlike wood, these materials don't require constant repainting and sealing to keep moisture out, saving you time and money.
- Increased Home Value: A new siding job is one of the top home renovations for return on investment, enhancing curb appeal and protecting the underlying structure of your home.
Choosing to replace your siding is the ultimate long-term fix. It solves recurring rot issues for good and is an investment that delivers peace of mind for years to come.
Common Questions About Dry Rot Repair
Even after you've mapped out a solid plan, a few questions always seem to pop up during a dry rot repair. It's totally normal. Getting these common concerns sorted out ahead of time is the key to tackling the project with confidence and ensuring your fix actually lasts.
One of the first things people ask is if they can just paint over the problem. The answer is a hard no. Painting over dry rot is like putting a nice-looking rug over a hole in the floor—it hides the problem but doesn't fix it. In fact, you'll probably make it worse by trapping moisture, which is exactly what the fungus needs to thrive.
Repair vs. Replace: Which Is Better?
Another big question is whether to patch a small section or just replace the whole board. Honestly, it all comes down to the scale of the damage.
For a small, contained spot of rot, a good two-part epoxy repair is a fantastic, budget-friendly option. When you do it right, the repaired section can end up even stronger than the original wood. But if the rot has really spread—say, it covers more than a third of a siding board or has jumped to neighboring pieces—replacement is the only smart move. Trying to patch up widespread decay just isn't a sustainable way to protect your home.
Is It Dry Rot or Termites?
It's surprisingly easy to confuse wood damage from fungus with damage from pests, but they leave behind very different clues. Figuring out which one you have is critical, because the treatments are completely different.
- Dry Rot: This fungus leaves a very specific blocky, cube-like cracking pattern called cuboidal fracture. The wood itself will be brittle, almost crumbly to the touch, and you might notice a musty, mushroom-like smell.
- Termite Damage: This is a bit sneakier. The wood might look okay from the outside but feel hollow. If you poke at it, you'll likely find tiny tunnels (galleries) running with the grain. You might also see little piles of what looks like sawdust, which are actually termite droppings called frass.
Key Takeaway: See cube-like cracks? You've got a fungus problem. Find tunnels and "sawdust"? That's an insect issue, and you'll need a totally different game plan.
Knowing these little details can save you a ton of time and money in the long run. And for those of you who manage a few properties or just want to get your home maintenance schedule dialed in, learning how to manage repair jobs efficiently is a huge plus. You can get some great ideas on streamlining these kinds of tasks by reading about optimizing your site's performance. A proper diagnosis is always the first step toward a permanent fix that will protect your investment for years to come.
Are you dealing with recurring dry rot or thinking it's time for a full siding replacement? The experts at Breeze Siding are here to help. We provide permanent solutions with high-quality, moisture-resistant materials designed for the Pacific Northwest climate. Contact us today for a free on-site estimate at https://breezesiding.com.
Article created using Outrank