
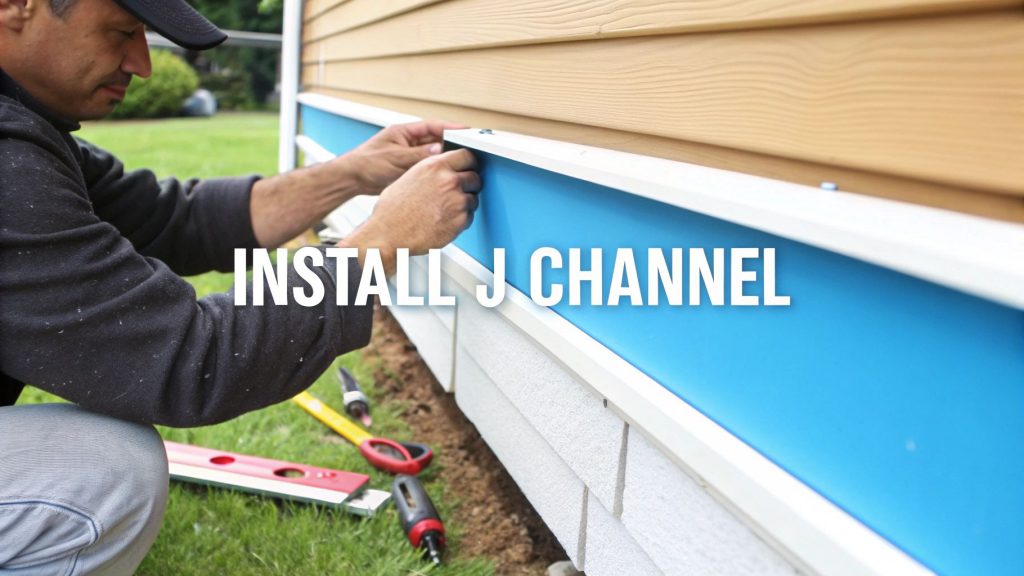
When you're preparing for a siding replacement, the process for installing J channel seems straightforward: measure, cut with your snips, and tack it up every 12-16 inches. But don't rush this critical step. That simple piece of trim is your siding's most important defense against water, especially in the damp Puget Sound climate, and getting it right is the secret to a professional job that lasts for decades.
Why a Perfect J Channel Installation is Crucial for Your Home
Before picking up your tools, let's discuss what J channel actually does. It’s more than just trim that makes windows, doors, and rooflines look clean. Think of it as the unsung hero of your home's exterior, especially for homes in rainy climates like Seattle and the surrounding areas.
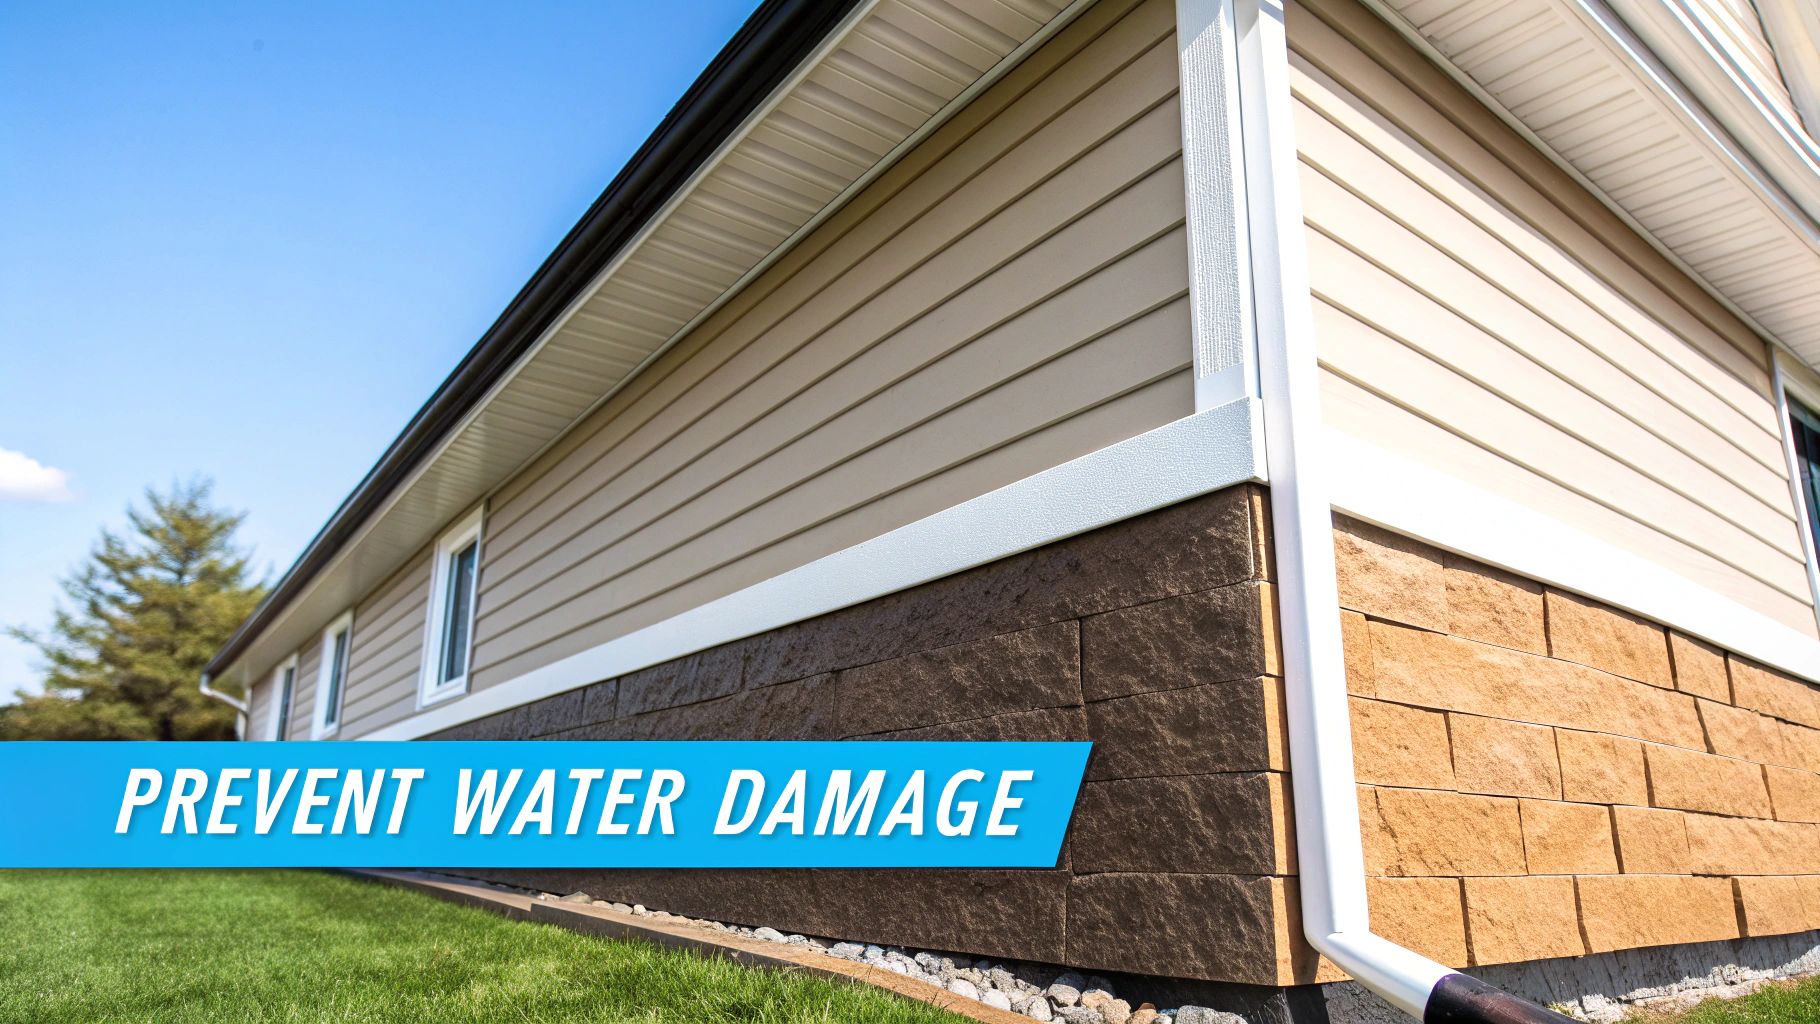
Its main job is to create a waterproof seal. When installed correctly, it directs rain away from the most vulnerable spots on your house, keeping it from sneaking behind your siding panels. For a siding replacement, this is your first and best line of defense against the kind of water damage that can lead to rot, mold, and expensive repairs down the road—a significant benefit of upgrading your home's exterior.
The Unseen Benefits of Professional Installation
Beyond keeping water out, J channel plays another critical role that many overlook: it allows the siding to move. Vinyl siding is designed to expand in the summer heat and shrink in the winter cold. A professional siding replacement accounts for this movement; a poorly installed J channel pins the siding in place.
When that happens, problems appear quickly.
- Buckling and Warping: On a hot day, siding that can't expand will have nowhere to go but out, creating ugly waves and ripples.
- Cracking and Splitting: In the dead of winter, trapped siding can become brittle and crack under the tension.
- Visible Fasteners: The pressure from restricted movement can cause nails to pop out or pull through the siding's nailing hem.
A correctly installed J channel isn't just about looks; it's a fundamental component of a dynamic siding system. Getting this one detail right transforms an average siding job into a durable, high-performance exterior that can withstand the elements for decades. A quality siding replacement is an investment in your home's long-term health.
J Channel Installation Quick-Start Checklist
Before you start cutting, it's always a good idea to lay out everything you need. This checklist covers the essentials for a smooth installation.
| Category | Essential Items | Pro Tip |
|---|---|---|
| Tools | Tape measure, speed square, tin snips, chalk line, hammer | Invest in a good pair of aviation snips (left and right cut). They make clean, precise cuts much easier than standard snips. A miter saw is a trade secret for perfect corners. |
| Materials | J channel, siding nails (1 ¼" to 1 ½" galvanized), house wrap, flashing tape | Always buy about 10% extra J channel to account for miscuts, overlaps, and waste. It's cheap insurance. |
| Safety | Safety glasses, work gloves | Vinyl shards from cutting can be sharp. Always wear eye protection. |
Having all your gear organized and within reach saves a ton of time and frustration once you're up on the ladder.
A Growing Industry Standard
The way we install J channel today has been refined over decades. Since vinyl siding first hit the market in the mid-20th century, best practices have constantly evolved to keep up with tougher building codes and the need for better weather resistance, especially in areas with significant rainfall.
It's no surprise that the global vinyl siding market was valued at $7.25 billion and continues to grow. Its popularity puts even more emphasis on mastering these professional techniques. You can find more vinyl siding market trends and see just how big this industry has become.
Getting Your Gear Together
Before you even think about making that first cut, let's talk about getting set up for success. Any pro will tell you that a smooth J channel installation starts long before you touch the house. It's all about having the right tools and materials laid out and ready to go.
There's nothing worse than being halfway up a ladder and realizing you're missing something. A little bit of prep work on the ground saves you a ton of hassle and ensures you get that clean, professional finish you're after.
The Tools of the Trade
You can get by with the basics, but using the right tools for the job makes a world of difference in both the quality and speed of your work. Here’s what I keep in my tool belt.
- Measuring & Marking: You absolutely need a good tape measure, a speed square for those perfect 90-degree angles, and a chalk line to snap long, straight guidelines. No guesswork allowed here.
- Cutting: This is where you can really see the difference between amateur and pro work. A sharp pair of aviation snips (or tin snips) is essential for making straight cuts and notching out corners. For mitering the corners around windows, a miter saw with a fine-toothed blade installed backward is the secret weapon. It sounds strange, but this trade method shears the vinyl for an incredibly clean edge without any chipping.
- Fastening: A solid hammer is your best friend. I prefer hand-nailing J channel because it gives you precise control. It's way too easy to overdrive the nails with a pneumatic gun, which can cause the vinyl to buckle down the road.
A Quick Word on Safety: Seriously, wear safety glasses. When you're cutting vinyl, tiny, sharp pieces can fly everywhere. This is especially true if you're using a power saw. It’s a simple step that can save you a trip to the emergency room.
Picking the Right Materials
Now for the materials. This isn’t the place to cut corners, because the wrong choices will show up later as rust stains or mismatched colors.
First up is the J channel itself. It has to be a perfect color match to your siding. Double-check the color code from the manufacturer. I always recommend buying about 10% extra—it’s cheap insurance against a bad cut or a measurement mistake.
Next, let's talk fasteners. You have to use corrosion-resistant nails. In a damp climate like we have in the Pacific Northwest, standard steel nails will rust and leave ugly streaks running down your siding in a year or two. Go for hot-dip galvanized or stainless steel. For length, 1 ¼" to 1 ½" is usually perfect, as you need at least ¾" of penetration into solid wood.
Mastering Pro-Level Measuring and Cutting
The difference between a siding job that looks a little shaky and one that looks sharp and professional for decades often comes down to one thing: precision. When you're learning how to install J channel, the real craft is in the measuring and cutting. Getting this part right is what gives you that perfect, watertight seal around tricky spots like windows, doors, and rooflines.
This is where you move from just covering edges to applying proven trade methods, like the "picture frame" technique around windows. It’s not just about hiding the cut ends of the siding; it's about creating a system of overlapping channels that forces water away from your wall sheathing. One sloppy cut can invite moisture in, but a precise one creates a barrier that lasts—a key benefit of a professional siding replacement.
This visual guide breaks down the fundamental steps for handling each piece of J channel.
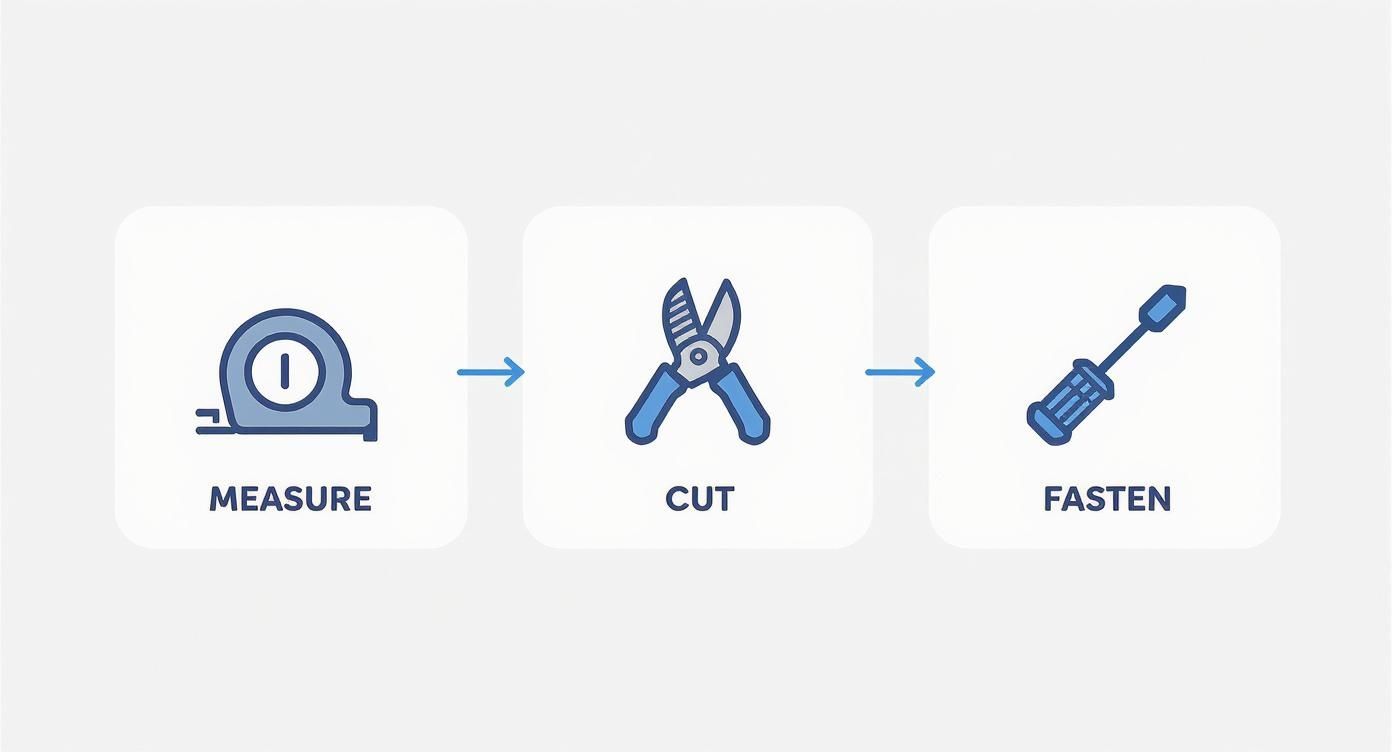
The workflow is simple at its core—measure, cut, fasten. These are the building blocks, and mastering them is key to a professional installation.
Creating the Picture Frame Around Windows
Let's walk through the most common scenario: framing a standard rectangular window. The whole idea is to build a J channel frame where the top piece overlaps the sides, and the sides overlap the bottom. It’s a simple, gravity-fed system that makes sure water always flows down and out, never in.
Here’s how it’s done:
- Tackle the Bottom First: Start with the piece that will sit under the window sill. Measure the width of the window opening and add twice the width of the J channel's face. For example, on a 36-inch window using 1-inch J channel, you'd cut a piece 38 inches long.
- Cut Your Notches: On each end of this bottom piece, you'll need to cut a 1-inch notch out of the back and the nailing hem. All you want left is the face of the channel. This creates a flat tab that will slide cleanly underneath the side pieces.
- Move to the Sides: Next, measure and cut the two vertical side pieces. Their length should run from the top edge of the bottom piece you just installed right up to the top of the window opening.
- Finish with the Top: The top piece is cut just like the bottom one—2 inches wider than the window itself. The key difference is cutting a small "drip edge" tab. You'll make a small slit on each end and bend that little tab down. This is a critical best practice that directs water running down the face of the channel out and away from the side channels below.
Executing Flawless Miter Cuts
When you get to an outside corner, nothing looks cleaner than a perfect 45-degree miter cut. This is where a miter saw (with the blade installed backward for cutting vinyl) really shines. This trade method gives you a crisp, factory-like edge that you just can't get with tin snips.
Just set your saw to a 45-degree angle and make a smooth, steady cut. When you bring the two pieces together, they should form a sharp, clean 90-degree corner. This technique is non-negotiable for prominent, highly visible corners on a home.
How you handle the J channel technically has a huge impact on the siding's longevity and the home's overall facade. Every mark, cut, and fastener has to account for the thermal expansion and contraction of the vinyl. With the vinyl siding sector projected to grow at a CAGR of 4.4% from 2025 to 2035, the demand for skilled, professional installation is only getting stronger.
Handling Complex Shapes
Of course, not every job is made of straight lines and right angles. For arched windows, you’ll need to make a series of small relief cuts along the nailing flange of the J channel, about every inch or so. These little cuts allow the otherwise rigid piece of vinyl to bend smoothly and follow the curve of the window.
The logic of water management still applies, even on complex jobs. You always want the higher pieces to overlap the lower ones.
Check out our siding project gallery to see more examples of these techniques applied in the real world. You'll notice how the tab on the top piece directs water over the side piece—it's these small details that make for a truly waterproof and long-lasting siding job.
Nailing the Installation: How to Secure J Channel for a Lasting Finish

You can make the most precise cuts in the world, but if you don't secure the J channel to the wall properly, it’s all for nothing. This is where you build real durability into your siding job, and it all comes down to one crucial rule that trips up so many DIYers. Getting the fastening technique right is what allows your siding to withstand everything from a freezing Pacific Northwest winter night to a scorching summer afternoon.
The single biggest mistake you can make when installing vinyl siding is driving your fasteners in tight. It’s counterintuitive, I know. But vinyl siding and its trim pieces need to move. As the temperature fluctuates, the material expands and contracts. If you pin it tightly against the wall, you're just asking for trouble—buckling, warping, and eventually, cracks.
The "Hang, Don't Pin" Method
To give the vinyl room to breathe, you need to leave a small gap between the fastener head and the nailing flange of the J channel. The sweet spot is about 1/32 of an inch. The easiest way to gauge this? It's roughly the thickness of a dime.
Think of it like this: the J channel should hang from the nail, not be pinned down by it. A good test is to see if you can slide the channel back and forth just a little bit after you've driven the nail. That tiny bit of play is the secret to a siding job that looks great for decades.
A lot of homeowners are surprised when I tell them a slightly loose fastener is the goal. We're so used to making things tight and secure. But with vinyl siding, driving a nail home is the quickest way to void a warranty and create problems down the road. That dime-sized gap isn't a friendly suggestion; it's a must-do for a professional install.
Fastener Placement and Spacing
Where you put the nails matters just as much as how deep you drive them. Following the industry standard ensures the channel stays put without restricting that critical movement.
Here’s what I do on every job:
- Spacing: I place a fastener every 12 to 16 inches. That’s plenty of support to keep things straight and secure.
- Centering: This is non-negotiable. The nail must go through the center of the nailing slot. Never drive it at the top or bottom. A centered nail gives the channel room to expand and contract equally in both directions.
- Penetration: Make sure your fasteners go at least ¾ of an inch into solid wood, whether that's the sheathing or a stud. You need that bite for real holding power.
Pro Tips for a Weatherproof Finish
With your fastening technique down, a couple of finishing touches can really set your work apart. These are the little details that pro installers use to make sure water stays on the outside, where it belongs.
When installing J channel over a window or door, create a drip cap. It's simple. On the top piece of channel, make a horizontal cut about an inch long at each end of the front face. Bend that little tab down over the side J channels. This acts like a tiny gutter, forcing water to drip away from the opening instead of running down into the side channels.
For long walls that require multiple pieces of J channel, you need to create a clean, weatherproof seam. Don't just butt the ends together. Instead, overlap them by about an inch. The key is to think about how water flows—always install the overlapping piece so that water runs over the seam, not into it.
Troubleshooting Tricky Spots and Common Mistakes
Every house has its quirks. You’re never going to find a siding job that’s just a long, straight, uninterrupted wall. Sooner or later, you'll run into something that the instruction manual didn't quite cover. Knowing how to handle these tricky spots is what really separates a professional-looking job from an amateur one.
This is where experience really pays off. Learning to anticipate issues with exterior lights, spigots, and utility meters will save you a world of frustration. The goal is always the same: create a clean, sealed finish that looks great and, most importantly, keeps water out.
Working Around Obstructions
You'll find all sorts of things penetrating the exterior walls of a home. The trick is to frame them out neatly so they look like they belong there while preventing them from becoming a leak point.
Exterior Lights and Outlets: For these, your best friend is a purpose-built mounting block. You'll install J channel around the block just like you would a window, creating that classic "picture frame" look. This gives you a clean, integrated finish and properly flashes the entire opening.
Spigots and Pipes: This is another job for a specialty block, often a split mounting block that can fit around existing pipes. The J channel then frames the block, not the pipe itself. Whatever you do, don't just cut a rough hole in the siding and try to seal it with caulk. That’s a guaranteed failure waiting to happen.
The whole point of these blocks is to maintain the integrity of your weather-resistant barrier. The key takeaway is to never let siding or trim touch the penetration directly; always use a dedicated mounting block as the go-between.
Common J Channel Installation Mistakes and Solutions
Even seasoned pros can make mistakes when they're in a hurry. But some of these common slip-ups can lead to serious problems like water damage or warped siding—costly things you definitely want to avoid. I've seen these mistakes derail countless projects, so let's look at how to get it right the first time.
| Common Mistake | Why It's a Problem | The Professional Solution |
|---|---|---|
| Nailing Too Tight | This is the #1 error I see. It pins the vinyl in place, preventing its natural expansion and contraction, which leads to ugly buckling and warping. | Leave a 1/32-inch gap (about the thickness of a dime) between the nail head and the J channel. The channel needs to hang loosely on the nail. |
| Reverse Laps | Overlapping pieces the wrong way creates a perfect little scoop to catch rainwater and funnel it right behind your siding. | Always overlap your J channel so the top (or "uphill") piece is on the outside. This ensures water sheds down and over the piece below it. |
| Cutting Pieces Too Short | This creates visible gaps at corners and around windows, leaving an open invitation for moisture and insects to get behind the siding. | The old saying holds true: measure twice, cut once. Always account for the overlap you'll need at corners to ensure everything fits snugly. |
By learning what not to do, you can save yourself a massive headache later. It's often the small details that make the biggest difference in the long run.
Understanding these common pitfalls is just as crucial as knowing the right steps. A single reverse lap or a section of nails driven too tight can undermine an otherwise perfect installation. Learning to spot these potential issues beforehand is how you start working like a seasoned pro.
Common Questions About J Channel Installation
Even the most well-planned siding project can throw you a curveball. Knowing the answers to a few common questions before you start can save you a ton of headaches, prevent costly mistakes, and ensure your new siding holds up to the wet Pacific Northwest climate. Let's dig into some of the things people often ask when they're learning how to install J channel.
Should I Caulk My J Channel?
It's tempting to want to seal every single gap with caulk, but when it comes to J channel, that instinct is actually wrong. You should never caulk the opening where the siding panels tuck in.
That gap is there for a reason. It's a critical part of the system, designed to let any moisture that gets behind the siding drain out. It also gives the vinyl panels the room they need to expand and contract as the temperature changes. If you block that channel, you're trapping water, which is a perfect recipe for mold and rot—a huge problem in rainy areas like Tacoma and Bellevue.
The only time you might use a tiny bit of sealant is at the mitered corners of a window frame, mostly for a cleaner look. But remember, it's the mechanical flashing underneath that's doing the real waterproofing work.
Finding the Best Way to Cut J Channel
For the cleanest, most professional-looking cuts, you've got two great options. Most of the time, a good pair of aviation snips (or tin snips) is your best friend. They give you fantastic control for making straight cuts and all the little notches you need for overlaps. It's the go-to method for most adjustments on the job.
But if you're framing out a bunch of windows and need perfectly repeated miter cuts, a miter saw is a total game-changer. The trick the pros use is to install a fine-tooth blade backward. This way, the blade shears through the vinyl instead of chipping it, leaving you with a flawless, factory-smooth edge every time.
Pro Tip: The most common mistake I see is nailing the J channel too tight. This one little error can cause an entire wall of siding to buckle and warp. You always have to leave about a 1/32-inch gap—roughly the thickness of a dime—between the fastener head and the vinyl. This lets it move.
Handling Curved Windows and Arches
So, what do you do with arched windows? You don't have to settle for a clunky workaround. The solution is to turn a standard piece of J channel into a flexible one.
Just take your snips and make a series of small, perpendicular relief cuts along the nailing flange, spacing them about an inch apart.
These little cuts allow the straight piece of vinyl to bend smoothly and follow the curve of the arch. Just be careful not to cut through the front face of the channel! Once it's shaped, drive a fastener into each solid tab of the nailing hem between your cuts to secure it firmly in place. This trick gives you a snug, continuous channel even on tricky designs.
For any siding project, whether it's a simple repair or a full-home replacement, having an experienced crew makes all the difference. If you're in the Puget Sound region and want a flawless finish that will protect your home for years to come, trust the experts at Breeze Siding. You can learn more about our professional installation services on our website.