
Putting up Hardie plank siding is a game-changer for your home's exterior, turning it into a tough, weather-resistant shield. But let's be clear: this isn't just about nailing up a few boards. It’s a serious investment in your home's future value and curb appeal, especially if you live somewhere with a demanding climate like the Pacific Northwest.
Success really comes down to careful planning, handling the material the right way, and sticking to the manufacturer's playbook.
Why You Need a Blueprint for Hardie Plank
Jumping into a siding replacement is a major project. A successful Hardie plank installation starts way before you even think about cutting the first board. Fiber cement isn't like vinyl or wood—it’s a unique material that needs a professional's touch and a solid plan. You've got to be honest with yourself about the tools, safety gear, and the skill required to get that perfect, factory-warrantied finish.
We're not just covering walls here; we're building a complete, multi-layered defense system for your house. This is absolutely critical in places like the Seattle area, where the constant damp and changing temperatures will quickly show you every single flaw in a rushed or sloppy job.
Looking at the Big Picture
Opting for Hardie Plank means you're choosing long-term performance over a quick fix. Yes, the upfront cost can be more than other options, but you get that money back in spades through its incredible durability and low-maintenance needs. It's no wonder so many homeowners are making the switch.
The numbers back it up, too. The global siding market was valued at a whopping USD 126.25 billion in 2023 and is only expected to climb. This growth is largely fueled by demand for high-performance materials like fiber cement. You can read more about siding market trends to see just how big this industry is getting.
What It Really Does for Your Home
When you get Hardie Plank installed by a pro, you unlock some serious benefits that make it the clear winner for protecting your home:
- Built to Handle the Elements: Hardie's products are "Engineered for Climate®," which means they're specifically designed to stand up to the constant rain, wind, and temperature swings we see in the Puget Sound region. No warping, cracking, or rotting.
- Serious Fire Protection: Fiber cement is non-combustible. This gives you a layer of safety and peace of mind that you just don't get with wood or vinyl siding.
- Keeps Pests and Rot Out: Unlike wood, Hardie Plank won't get chewed up by termites or pecked by woodpeckers, and it's completely immune to fungal decay.
I see this all the time: people assume all fiber cement siding is created equal. It's not. The specific formula and strict quality control behind the Hardie brand deliver a level of performance that cheaper knock-offs just can't touch. That's how you avoid problems like early cracking and shrinking down the road.
When you treat your siding project like a strategic blueprint instead of just another weekend task, you set yourself up for an exterior that not only looks great but also protects and adds value to your home for decades.
Before we dive into the nitty-gritty of the installation process, let's take a high-level look at the project. This table breaks down the entire job into manageable phases, helping you understand what to expect from start to finish.
Hardie Plank Project at a Glance
| Phase | Key Objective | Critical Tip |
|---|---|---|
| Preparation | Ensure a clean, stable, and waterproof substrate for the siding. | Don't skip the house wrap! A high-quality, properly installed weather-resistive barrier is your home's last line of defense against moisture. |
| Cutting & Handling | Make precise cuts while minimizing dust and protecting the material. | Always use a saw blade designed specifically for fiber cement to get clean cuts and reduce dangerous silica dust. Wear a proper mask. |
| Fastening | Securely attach each plank according to manufacturer specifications for durability. | Nail placement is everything. Keep fasteners at least 3/4 inch from board edges and drive them snug, not countersunk. |
| Finishing | Caulk, paint, and detail the installation for a watertight and flawless look. | Use a high-quality, paintable elastomeric sealant designed for fiber cement. Pay close attention to butt joints and trim areas. |
Think of this table as your roadmap. Each phase builds on the last, and getting one step right makes the next one that much easier. Now, let's get into the details.
Getting Your Home Ready for Flawless Siding
You can have the best siding in the world, but if the prep work is sloppy, it just won't last. A truly professional, long-lasting siding job is built on the foundation you lay before the first plank even goes up. This is the stuff that separates a top-tier installation of hardie plank from one that's going to cause headaches down the road, especially here in the damp Pacific Northwest.
It all starts by tearing off the old, failing siding. This isn’t just about demolition; it’s a critical diagnostic step. Once the old stuff is gone, we get our first real look at your home’s sheathing—the plywood or OSB layer that's been hiding underneath. This is our chance to see what’s really going on with your home's structure.
Uncovering and Fixing Hidden Damage
With the old siding stripped away, a thorough inspection of the sheathing is an absolute must. We're on the hunt for any evidence of water intrusion, which usually shows up as soft spots, dark discoloration, or outright rot. Just covering this up is one of the biggest mistakes an installer can make, as it guarantees major structural problems later.
Any sheathing that's been compromised gets cut out and replaced with fresh, solid material. This gives us a sound, flat, and secure surface for the new Hardie siding. A proper inspection ensures the new planks have a stable base to attach to, which is key to preventing ugly waves or fasteners that pop out over time.
This infographic breaks down these crucial first steps, from the initial tear-off to the detailed inspection.
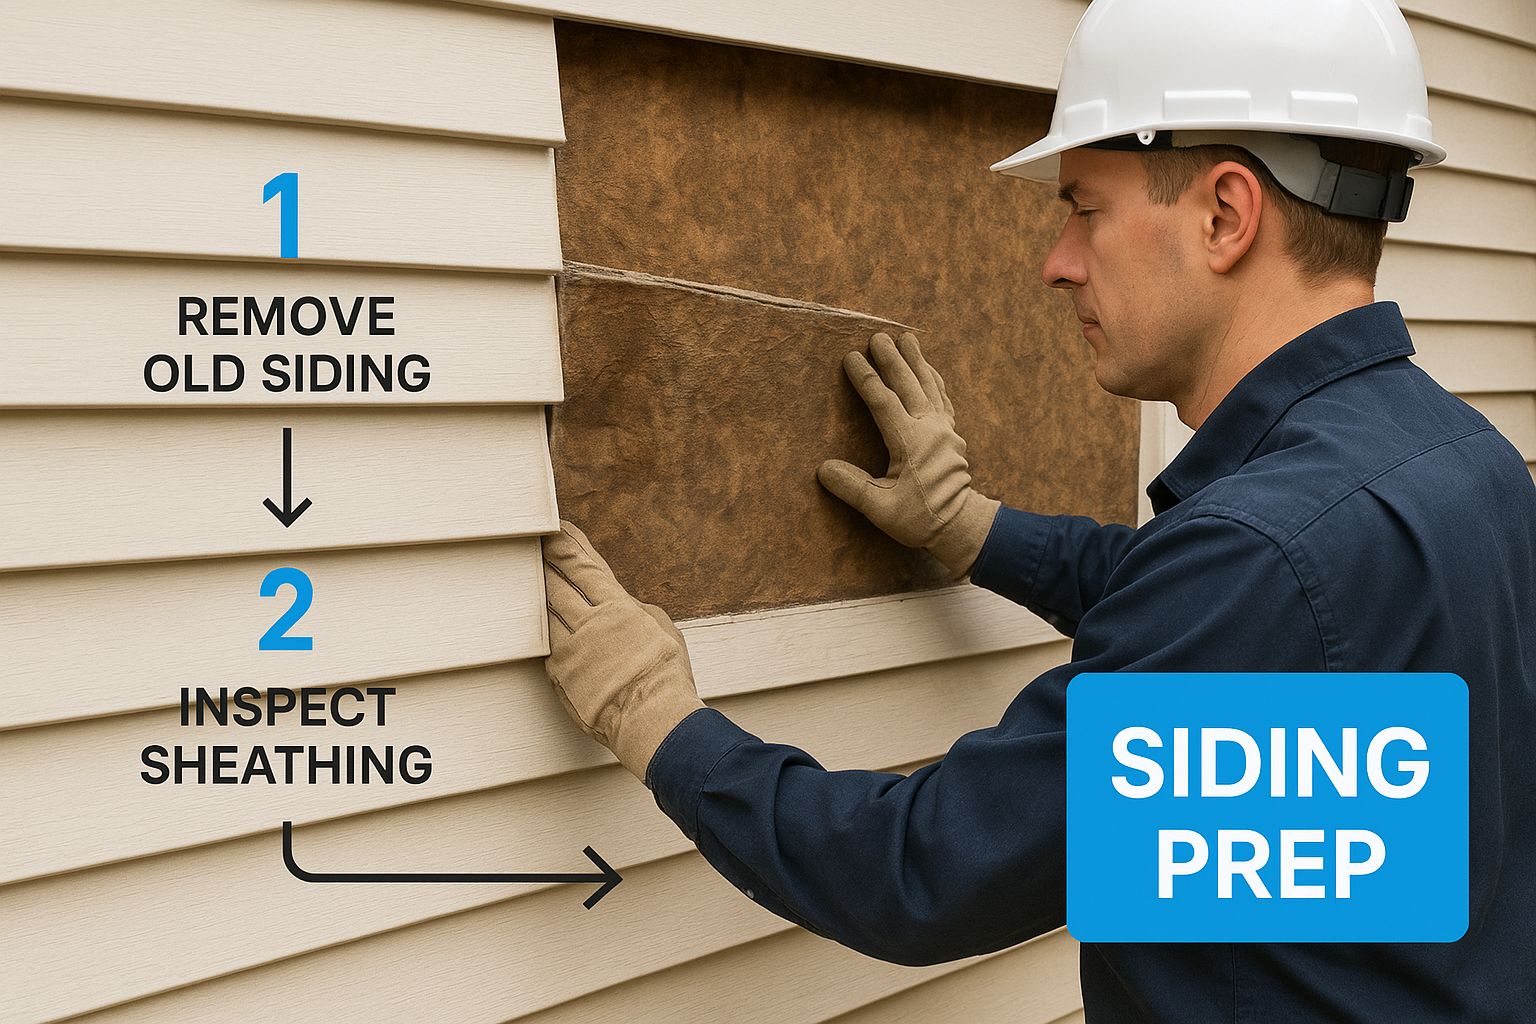
It really highlights the meticulous process that goes into making sure the layers underneath are just as tough as the new siding itself.
Building a Bulletproof Water Management System
Once we've confirmed the sheathing is solid, the next move is to wrap the entire house in a high-quality weather-resistive barrier (WRB), or what most people call house wrap. Think of it as a protective shell for your home. It’s engineered to block liquid water from getting to the sheathing but still allows water vapor to escape from inside the walls.
Getting the installation right is everything.
- Shingle-Style Overlaps: We always install the WRB so the upper layers overlap the lower ones by at least 6 inches. This shingle-style application uses gravity to its advantage, forcing any water to run down and away from the seams.
- Taping Every Seam: Every single vertical and horizontal seam gets sealed with a high-performance contractor's tape. This creates an unbroken, airtight, and watertight barrier—something that’s non-negotiable in the Seattle rain.
We’ve seen jobs where installers used the wrong tape or skipped it completely to save a few bucks. That totally defeats the purpose of the house wrap. We only use specialized tapes that are designed to stick aggressively and create a seal that lasts for decades.
With the main WRB in place, we focus on the weak points: your windows and doors. This is where proper flashing is the unsung hero. We carefully apply self-adhering flashing tape around every opening, integrating it with the WRB to create a system that actively channels water down and out, keeping the inside of your walls bone dry.
Setting Up a Safe and Efficient Work Zone
The last piece of the prep puzzle is organizing the job site for success. Hardie plank is heavy, and it can be surprisingly brittle if you don't handle it right. The boards have to be stored perfectly flat, kept off the ground, and protected from moisture until the moment they’re installed. Dropping a board or stacking it improperly can easily lead to chipped corners and cracks, making it completely unusable.
A well-organized work zone keeps the materials safe and helps the installation flow smoothly. This means setting up cutting stations to minimize dust and having every tool and fastener exactly where you need it, when you need it. It’s this professional-level prep work that’s truly fundamental to a flawless siding replacement that will protect your home for years to come.
Alright, with your home prepped and wrapped, it's time to get into the real work: cutting and fastening the Hardie Plank. This is where the skill of the installer truly shows. It’s one thing to hang a board, but it's another thing entirely to cut it with a factory-perfect edge and fasten it so it stands up to decades of Pacific Northwest weather.
Unlike wood or vinyl, you can't just wing it with fiber cement. There are specific techniques you have to get right, from managing the dust to placing every single nail perfectly.
Honestly, getting the cutting and fastening right is non-negotiable. It's the difference between a job that looks professional and one that fails in a few years.
Getting Clean Cuts (Without the Dust Cloud)
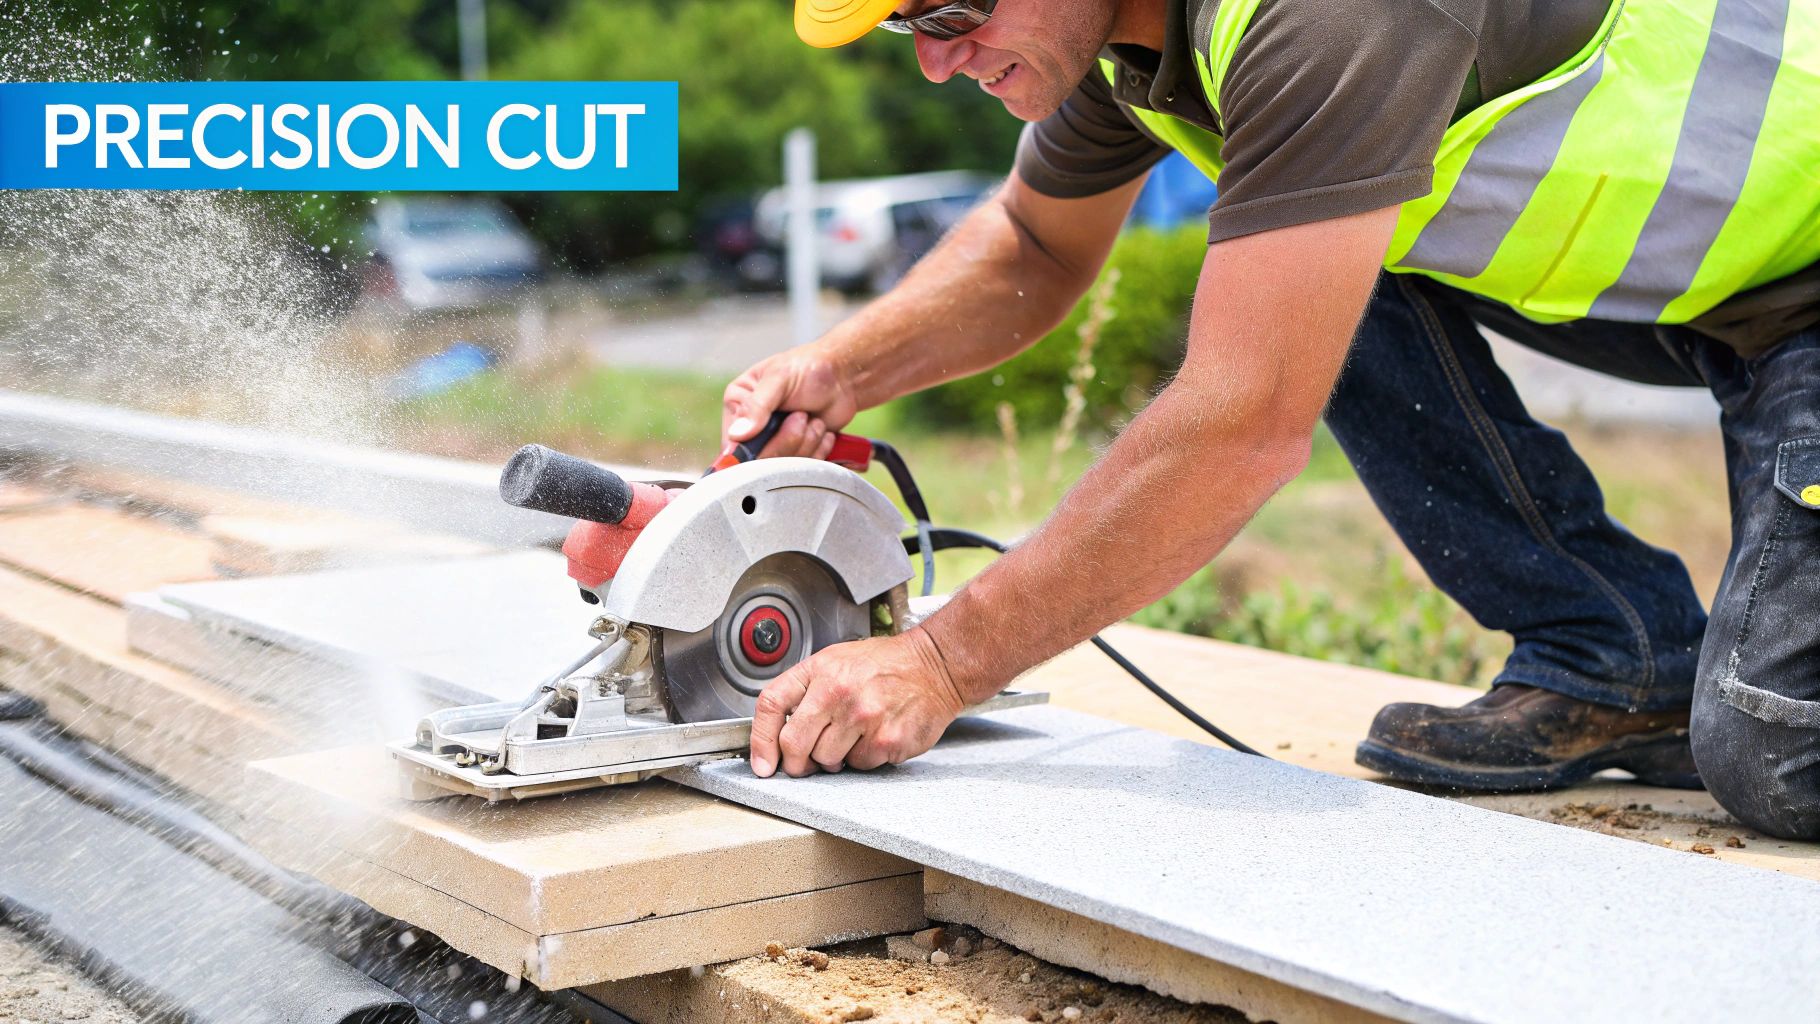
Cutting Hardie Plank creates a lot of fine silica dust, which you absolutely do not want to be breathing in. The game is to make precise cuts while keeping that dust to an absolute minimum. The tool you pick really depends on how much cutting you're doing.
Pneumatic or Electric Shears: If you're just doing a small repair or making a few quick cuts, fiber cement shears are a fantastic option. They work by nibbling through the board, which creates very little airborne dust. The only downside is they're a bit slower and the edge isn't quite as pristine as what you'd get from a saw.
Circular Saw with a PCD Blade: For a full re-siding project, you need speed. That's where a circular saw with a polycrystalline diamond (PCD) blade comes in. These blades are specifically designed for fiber cement and will give you clean, fast cuts all day long. But be warned: this method kicks up the most dust, so a good respirator and a dust collection system hooked up to your saw are essential.
A classic DIY mistake is trying to use a regular wood-cutting blade on Hardie Plank. It will be completely wrecked after a handful of cuts, and you'll be enveloped in a massive cloud of hazardous dust. Do yourself a favor and invest in the proper PCD blade. It's a must for both your safety and the quality of the job.
No matter what tool you use, always wear a NIOSH-approved respirator (N95 or better), safety glasses, and hearing protection. I always set up a dedicated cutting station away from the house to keep the dust contained.
The Art of Nailing it Down
How you attach the planks is just as critical as how you cut them. If you fasten them incorrectly, you can easily void the James Hardie warranty and create pathways for water to get in. Everything from your nail placement to the depth of the nail matters.
The first piece of siding is the most important one—it sets the foundation for the entire wall. We always start with a starter strip. This is just a thin strip of fiber cement or metal that goes along the very bottom of the wall. It kicks that first plank out at the correct angle, which ensures every row that follows lays perfectly flat and creates a proper drip edge.
It's this kind of durability and attention to detail that's making fiber cement siding so popular. The market is expected to more than double, growing from $5.09 billion in 2024 to $10.58 billion by 2034. People are choosing it because it looks great, lasts forever, and holds its value. You can discover more insights about the fiber cement market to see just how fast it's growing.
Blind Nailing vs. Face Nailing: What's the Difference?
There are two main ways to nail Hardie Plank, and a pro knows exactly when to use each one. The method you choose affects both the final look and the siding's ability to resist high winds—a serious consideration here in the Puget Sound region.
Blind nailing is what we use for most of the job. It gives you that beautiful, clean look with no visible fasteners. You drive the nail through the very top of the plank (about an inch down from the edge), and then the next course of siding completely covers the nail head. Simple and clean.
Face nailing is the heavy-duty method. Here, you drive the nail right through the face of the plank near the bottom. You’ll see the nail heads, but this technique provides incredible holding power against wind. Building codes often require face nailing for the top few courses of siding and on gables where the wind is strongest.
Making the right choice between these two techniques is crucial for a lasting installation.
Choosing Your Hardie Plank Fastening Method
| Technique | Best For | Appearance | Pro Tip |
|---|---|---|---|
| Blind Nailing | General wall areas for a seamless, high-end look. | Clean and smooth, with no visible fasteners on the face of the siding. | Use a pneumatic siding nailer with a depth adjustment to drive nails perfectly flush without over-driving them. |
| Face Nailing | High-wind areas, gables, and the top two courses for maximum hold-down power. | Visible nail heads, which should be installed in a neat, straight line for a tidy look. | Always pre-drill holes if hand-nailing near an edge to prevent cracking the board. Use stainless steel ring-shank nails. |
The key is to manage your fasteners properly. Every nail needs to go at least 1-1/4 inches into solid wood framing. You want the nail head to sit perfectly snug against the plank—drive it too deep and you'll fracture the siding, creating a weak spot where water can get in. A truly professional job perfectly balances the clean aesthetics of blind nailing with the structural security of face nailing exactly where it's needed most.
Achieving a Professional Finish with Trim
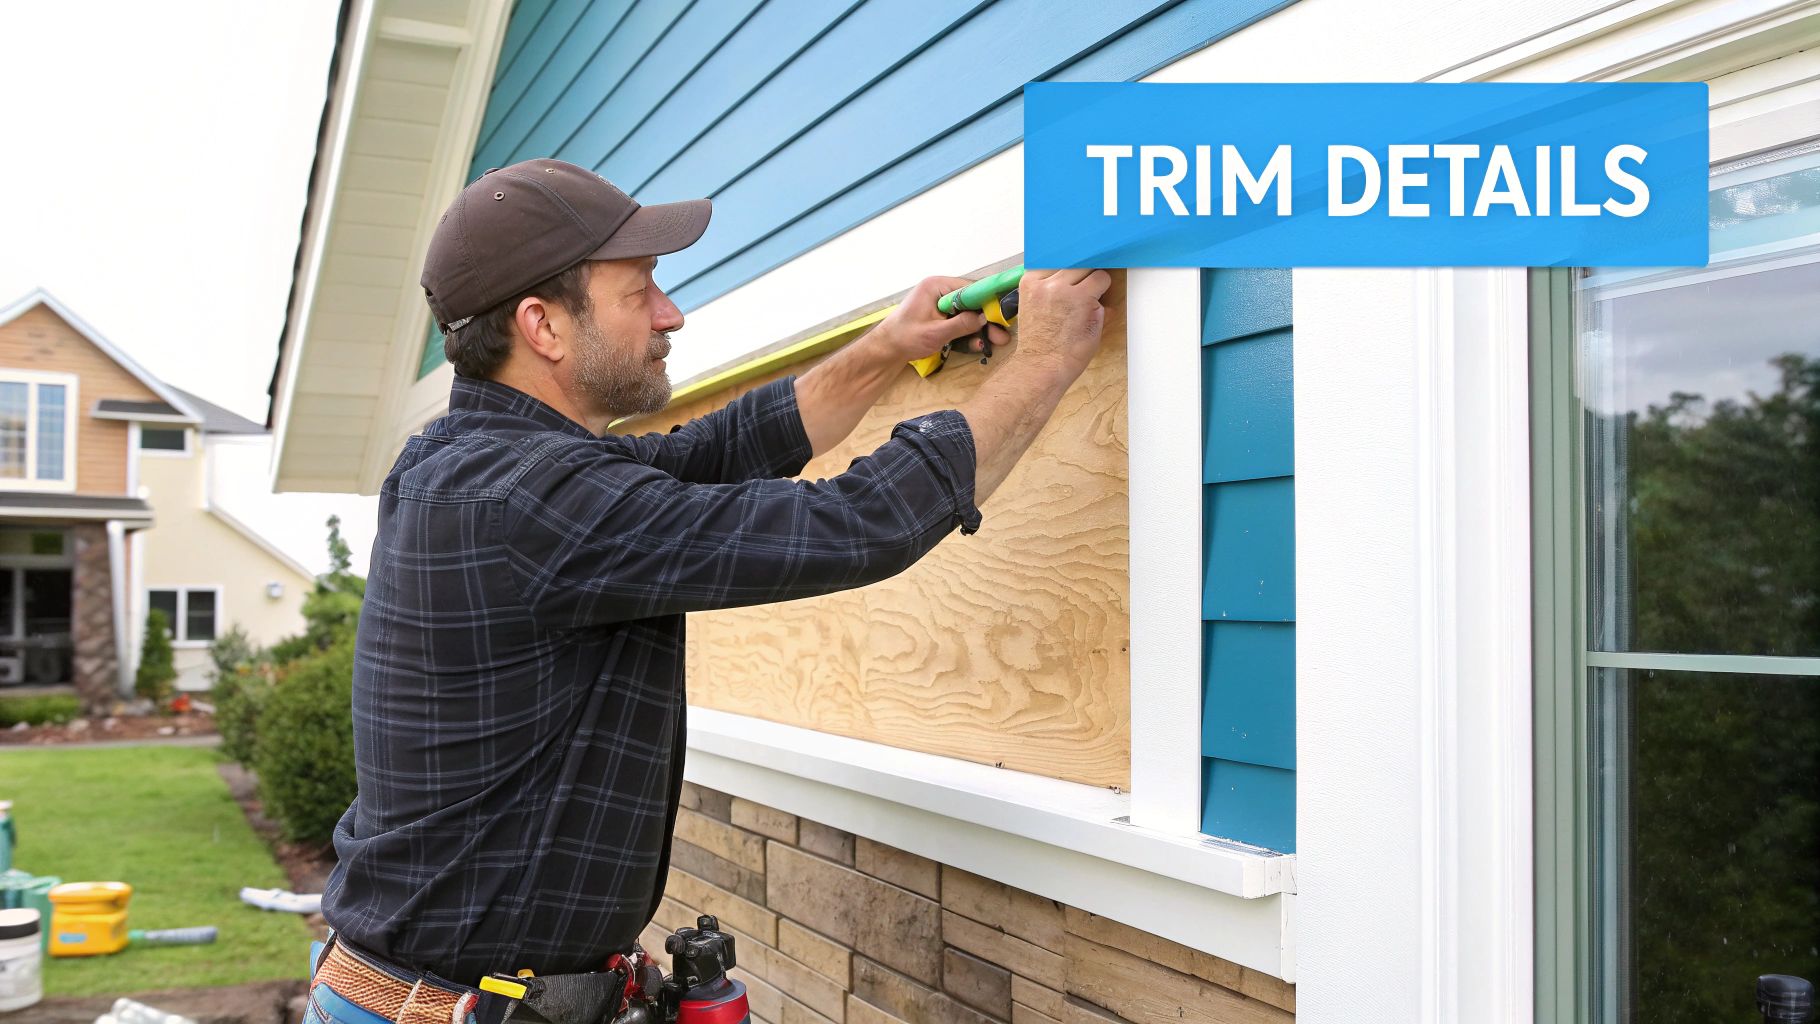
Once the main siding planks are up, the job shifts from covering big areas to finessing the details. This is the stage where the installation of hardie plank goes from being a simple wall covering to a crisp, architectural statement. The trim work—around corners, windows, and under the eaves—is what truly defines the final look and provides the last line of defense against the elements.
Getting these finishing touches right is non-negotiable. It’s the difference between a job that looks good from the street and one that holds up under close inspection for decades. Proper trim adds character, creates clean, sharp lines, and completes the weather-resistant seal for your home.
Honestly, this final stage is all about precision and patience. It’s where you use the right materials to make sure every single edge is perfect.
Framing the Design with Corner and Window Trim
Think of trim pieces as the bones of your siding design. HardieTrim® boards are thicker and more substantial than the planks, giving them the heft needed to boldly frame your home's features. We always install the corner trim first, as this creates the vertical boundaries that the lap siding will butt up against.
A tried-and-true method we use is creating a "boxed corner" with two trim boards, which adds a classic sense of depth to the home’s profile. For a more modern look, some designs call for a single, wider trim piece on one side of the corner instead.
Next come the window and door casings. These have to be installed with absolute precision—level and plumb—to create a perfectly square frame for the siding to meet. A crucial detail here is how the trim integrates with the flashing system we installed earlier. You have to ensure any water that hits the window is directed over the trim and far away from the wall.
The Critical Role of Expansion Gaps and Sealant
Fiber cement, like any exterior material, moves. It expands and contracts just a little with changes in temperature and humidity. A pro always accounts for this by leaving specific gaps where siding planks meet the trim. This isn't a mistake; it's a non-negotiable requirement for a long-lasting job.
James Hardie's specs call for a 1/8-inch gap between the end of a siding plank and the edge of the vertical trim. It might seem small, but that tiny space is everything.
Forgetting this 1/8-inch gap is one of the most common DIY errors. When planks expand in the summer heat, they push hard against the trim. Without that gap to absorb the movement, the pressure can cause the siding to buckle or even crack the trim boards over time.
Of course, this gap isn’t left open to the weather. It’s designed to be filled with a high-quality, paintable elastomeric or polyurethane sealant. This type of sealant stays permanently flexible, stretching and compressing with the building materials through every season without cracking or pulling away.
When you're choosing a sealant, make sure it meets these criteria:
- ASTM C920 compliant: This is the industry standard for high-performance sealants, guaranteeing it has the required elasticity and durability.
- Permanently flexible: It needs to handle joint movement of at least 25% without failing.
- Paintable: Once it cures, you need to be able to paint over it smoothly to blend in with the siding and trim.
Applying sealant correctly is an art. You need to tool the bead so it’s smooth and slightly concave, ensuring it makes solid contact with both the siding edge and the trim face. This creates a watertight seal that's truly built to last. For a great visual of how crisp lines and proper sealing come together, check out this example of a finished siding project.
Perfecting the Paint for a Flawless Finish
The final step is the paint. If you’re using James Hardie’s ColorPlus® products, the factory-applied finish is incredibly tough. But cut ends, and any accidental scuffs on the job site, will need a touch-up.
It's vital to use the exact color-matched touch-up paint from James Hardie. The best method is to apply it sparingly with a small artist’s brush or a touch-up pen. Whatever you do, don't use a large brush—it will create a noticeable difference in texture and sheen compared to the baked-on factory finish.
If you're working with primed boards that will be painted on-site, the paint you choose is just as important as the sealant. We always recommend a premium 100% acrylic exterior paint. These formulas adhere best to fiber cement and have the flexibility to move with the siding, which means they resist peeling and cracking for years. We always apply two full coats for maximum durability and color retention, ensuring the home looks perfect from day one.
Common Installation Mistakes to Avoid
Even a perfectly planned Hardie plank project can go south fast because of a few common, yet critical, mistakes. Trust me, learning to spot these pitfalls is just as important as knowing the right way to do things. These aren't just little cosmetic hiccups; they're the kind of errors that kill your siding's performance, can void the warranty, and often lead to some serious water damage down the road.
A lot of these problems happen when installers treat fiber cement like it's just another type of wood or vinyl siding. It's not. Hardie has its own rulebook, and when those manufacturer guidelines get ignored, you end up with siding that bows, cracks, or leaks within just a few years.
Getting the Butt Joints Wrong
One of the most frequent and damaging mistakes I see out in the field is the mishandling of butt joints—that’s the vertical seam where two siding planks meet. Amateurs tend to make one of two critical errors here, and both can have ugly consequences for your home.
The Mistake: The installer either caulks the butt joints or, just as bad, forgets to put flashing behind them. James Hardie specifically forbids caulking these joints. Why? Because that caulk is guaranteed to fail, leaving you with a cracked, ugly seam that actually traps water instead of shedding it. On the flip side, if there's no joint flashing behind the seam, any water that slips through has a direct highway to your sheathing.
The Right Way: Every single butt joint needs a strip of joint flashing (at least 6 inches wide) tucked behind it. Think of this little strip as a hidden drainage plane. It catches any water that gets past the seam and directs it safely out over the top of the plank below. The planks themselves should be installed in "moderate contact"—just touching lightly, not jammed together.
"If they’re not installed properly, they’re not going to perform the way they’re intended." This is a tough lesson for homeowners who find out their failing siding wasn't a product defect, but an installation screw-up. Proper joint treatment is non-negotiable for a watertight wall.
Over-Driving the Nails
How a nail or screw goes into Hardie plank matters. A lot. A common shortcut for crews trying to fly through a job is cranking up the pressure on their pneumatic nailers. This leads to over-driven fasteners, and it’s a big problem.
The Mistake: When a nail head is blasted too deep, it punches right through the face of the plank, creating a fractured little dimple. This doesn't just weaken the board; it shatters the factory paint finish. Every one of those over-driven spots becomes a tiny bowl that collects water, inviting moisture to sit and soak into the fiber cement core.
The Right Way: Fasteners have to be driven snug and flush with the surface of the siding—never countersunk. A true pro is constantly tweaking the depth setting on their nail gun because the density of the framing behind the siding can vary. The goal is for the nail head to make perfect, firm contact without ever breaking the board's surface.
Forgetting About Clearances
Hardie Plank needs breathing room to shed water properly. The manufacturer's instructions are crystal clear about the minimum gaps you have to leave between the siding and other surfaces. Ignoring these is just asking for moisture problems.
Here are the key clearances that get missed all the time:
- Roofing: You need a 1 to 2-inch gap between the bottom edge of your siding and any roof surface. This stops water from wicking its way up into the plank.
- Horizontal Flashing: Leave a 1/4-inch gap above any horizontal flashing (like the metal trim over windows and doors). This creates a drip edge so water can escape.
- Ground/Pavement: The siding must end at least 6 inches above the ground, a deck, or a concrete patio. This protects it from standing water and splash-back during a rainstorm.
The Mistake: When siding is installed jammed tight against a roofline or sitting on a patio, it acts like a straw, sucking moisture right into the board. Over time, this causes the bottom edges to get soft, rot, and peel paint.
The Right Way: This part is all about careful measuring and cutting. Take the time to cut each board to respect these clearance minimums. It’s the only way to guarantee water has a clean path to drain away from the wall, keeping your siding solid for years to come.
Got Hardie Plank Questions? We’ve Got Answers.
Even the best guides can leave you with a few lingering questions when you're knee-deep in a siding project. It's those specific, real-world details that often make the difference between a job well done and a costly do-over. We hear the same questions pop up time and again from homeowners around Seattle, so let's tackle them head-on.
Getting these details right is what separates a beautiful, long-lasting installation from one that fails prematurely.
Do I Really Need a Special Saw Blade for Hardie Plank?
Yes, absolutely. This is one of those non-negotiable points for both safety and the quality of your cuts. If you try to use a standard wood-cutting blade, it will get chewed up and become dull almost immediately. Worse, it will kick up a huge, dangerous cloud of silica dust.
You have a couple of solid choices for doing it right:
- Polycrystalline Diamond (PCD) Blade: For any job bigger than a small patch, this is what the pros use. These blades are specifically engineered for fiber cement. They slice through it cleanly for a factory-perfect edge and, when hooked up to a dust collection system, keep the air much clearer.
- Fiber Cement Shears: If you're just doing a small repair or need to make a few quick cuts, a pair of electric shears is a fantastic dust-free option. Instead of sawing, they nibble through the board, which means you don't get those hazardous airborne particles.
What’s the Right Way to Handle the Seams Between Boards?
How you treat the butt joints—where the ends of two planks meet—is critical for keeping water out. The single biggest mistake we see is people filling these vertical gaps with caulk. It might look sealed at first, but that caulk will absolutely crack and fail over time.
Instead, James Hardie specifies "moderate contact," meaning the board ends should just lightly touch each other. The real weatherproofing comes from a small piece of joint flashing that you place behind every single joint. This little piece of metal is your secret weapon; it catches any moisture that might sneak past the seam and channels it safely down and away from your home's structure.
As a rule of thumb, always stagger your joints so they don't line up vertically, which creates a much cleaner look.
It's tempting to skip the joint flashing to save a few minutes, but this is a corner you can't afford to cut. Leaving it out can compromise the entire wall, leading to hidden water damage that can fester for years before you ever notice it. It’s a tiny detail with massive consequences.
Can I Just Install Hardie Plank Right Over My Old Siding?
That's a hard no. Putting new siding over old is a critical mistake that can trap moisture against your home’s sheathing, creating a perfect environment for rot. On top of that, installing over an uneven surface means the new Hardie Plank will never lie flat, leaving you with a wavy, unprofessional-looking finish.
The only correct way to do it is with a full tear-off of the old siding. This is your chance to inspect the sheathing underneath for any damage, install a fresh weather-resistive barrier (like house wrap), and give your new siding the clean, solid foundation it needs for a valid warranty and a decades-long life.
Ready to make sure your siding project is done with the expertise it deserves? The team at Breeze Siding has spent years perfecting our craft as a James Hardie Preferred Installer for homeowners all over the Seattle area.
Get in touch today for a free, no-obligation estimate, and let's protect your home with a flawless installation. You can learn more about our process at https://breezesiding.com.