

Proper maintenance of cedar siding isn't just another seasonal chore—it's one of the smartest things you can do to protect your home's value and structural integrity in the unique climate of the Pacific Northwest. Think of it as a small investment of your time. A little regular cleaning, a careful inspection, and timely sealing can shield those natural wood fibers from our region's persistent moisture, pests, and the sun, preventing widespread decay and saving you from a massive siding replacement bill down the road.
Why Your Cedar Siding Needs Proactive Care
Your cedar siding is more than just decoration; it's the armor for your home, battling the elements 24/7. The very things that make cedar so desirable—its natural rot-resistant oils and gorgeous grain—are also what make it vulnerable when it's neglected. So, proactive maintenance isn't about tedious work; it's about safeguarding your biggest asset.
Viewing this upkeep as an ongoing shield helps you stay ahead of the wood's primary enemies. Here in the Puget Sound, our damp winters and persistent moisture create the perfect breeding ground for mildew, moss, and rot. A bit of attention each season is all it takes to keep these problems from ever getting a foothold.
The Impact of Our Local Climate
Living in the Seattle area presents some unique challenges for any wood siding. The constant drizzle and high humidity can easily saturate unprotected cedar, which leads to swelling, warping, and eventually, decay. This is especially a problem on the shaded, north-facing sides of a house or in spots near dense trees and shrubs where the siding never really gets a chance to dry out.
The goal here isn't just about looks. It's about making sure your siding can do its most important job: protecting your home's structure. When siding fails, moisture can get behind the walls, leading to issues far more serious than a bit of peeling stain.
The infographic below really nails the simple, cyclical process of proactive care that keeps cedar looking and performing its best for years.
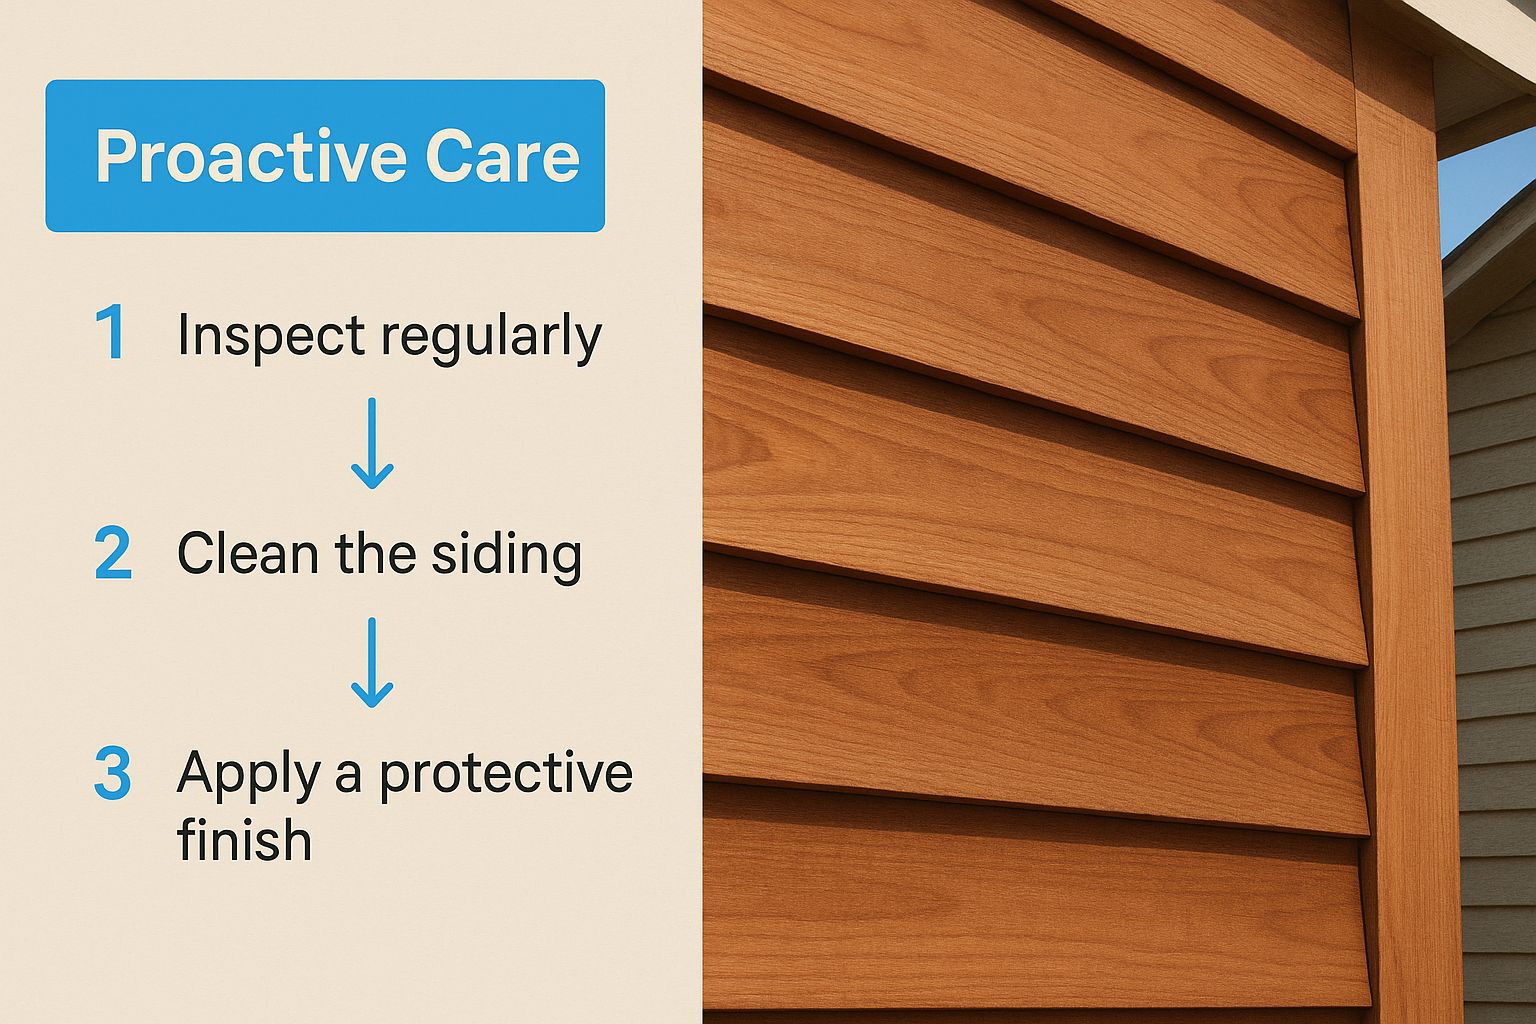
As you can see, it's a continuous loop. Inspect, clean, and seal. This simple rhythm forms a protective barrier that keeps your home safe.
Preserving Your Home's Value and Appeal
Let's be honest, your home’s exterior is the first thing anyone notices. It sets the tone for its curb appeal and directly impacts its market value. Beautifully maintained cedar siding tells the world this is a well-cared-for home. On the other hand, peeling stain or boards tinged with green can be a major red flag for potential buyers in competitive markets like Bellevue or Kirkland. Regular upkeep ensures your home always makes a great first impression.
Cedar has been a go-to building material in North America for ages because it’s both beautiful and durable. But with challenges like fluctuating lumber prices, protecting what you have is more important than ever. You can find more market insights about exterior cedar siding on datainsightsmarket.com.
Ultimately, a small investment in annual maintenance of cedar siding pays you back in huge ways.
- It prevents widespread rot. Catching and sealing a small crack today stops water from seeping in and causing a major repair job tomorrow.
- It deters insect damage. Carpenter ants and termites love moist, soft wood. Keeping your siding dry and sealed makes your home a much less inviting target.
- You'll avoid costly siding replacement. The cost to re-side a whole house can be staggering. Good maintenance can extend the life of your cedar for decades, pushing that massive expense far into the future.
Your Seasonal Cedar Siding Inspection Checklist

The real secret to keeping cedar siding looking great for decades isn't one massive, weekend-long project. It's all about consistency. You have to catch the small problems before they have a chance to turn into expensive, whole-wall repairs. Think of it like a regular health checkup for your home's exterior.
A seasonal inspection is your single best tool. It trains your eye to spot the subtle signs of trouble that most people walk right past. This simple habit is the absolute foundation of effective maintenance of cedar siding.
Spring Inspection: Assessing Winter's Toll
After months of rain, snow, and freeze-thaw cycles, spring is the perfect time for your first real inspection of the year. This is when winter’s damage really shows itself.
Start by focusing on the areas where water naturally collects. Get up close and look at the siding right under your gutters, around window sills, and especially near the ground. You're looking for faint, dark specks or even a greenish haze—the first tell-tale signs of mildew and algae starting to form.
Pro Tip: Here's a trick straight from the pros for finding hidden rot. Take a plastic putty knife and gently press it against the butt ends of the boards, particularly near corners and downspouts. If the wood feels even slightly spongy or soft, you’ve found a problem that needs to be addressed before it spreads.
Also, keep an eye out for any popped nails or boards that look like they're starting to warp or cup. That's a classic signal that moisture has worked its way behind the siding, causing the wood to swell.
Summer Check: Sun, Heat, and Pests
Summer brings its own set of challenges, mainly intense UV rays that can bake the finish right off your siding. On a bright, sunny day, take a slow walk around your house, paying special attention to the south and west-facing walls, which get the most sun.
You're looking for spots where the color seems faded, chalky, or just plain dry. A healthy, protected finish will have a bit of a sheen and make water bead right off. If the wood looks thirsty and seems to soak up moisture, your UV protection is gone. That's your cue to start planning a cleaning and re-staining project.
Summer is also prime time for pests. Look for:
- Tiny, perfectly round holes: Could be a sign of wood-boring bees or beetles.
- Piles of fine sawdust (frass): Check for this on the ground directly below siding. It often points to carpenter ants.
- Heavy webbing in corners: Spiders themselves aren't the issue, but their webs are great at trapping moisture against the wood.
Fall Prep: Battening Down the Hatches
Your autumn walk-around is all about getting your home ready for the wet months ahead. Your goal is to eliminate any potential entry points for water. Carefully check all the caulked seams around your windows, doors, and corner trim. If you see any cracks or gaps where the old caulk has shrunk or pulled away, it needs to be replaced.
And, of course, make sure your gutters are clean. This is non-negotiable. Overflowing gutters will just dump a waterfall right down your siding, overwhelming even the best sealant. A quick gutter clean-out is probably the most effective preventative task you can do.
Keeping your siding in top shape is a key reason for its popularity. In 2023, the global siding market hit nearly $99,979.30 million, driven by new construction and the demand for long-lasting, low-maintenance materials like properly cared-for cedar. You can find more siding market trend analysis to see how materials like cedar continue to perform.
For a quick reference, here's a simple guide to keep you on track throughout the year.
Seasonal Cedar Siding Inspection Guide
This table breaks down the key focus points for each season, helping you create a simple, repeatable routine.
| Season | Key Inspection Points | Pro Tip |
|---|---|---|
| Spring | Check for moisture damage, mildew, algae, and soft spots, especially near the ground and under gutters. Look for popped nails or warped boards. | Use a plastic putty knife to gently poke the butt ends of boards. If it feels soft, you've likely found rot. |
| Summer | Inspect for UV damage (faded, chalky finish) on sun-exposed walls. Look for signs of insects like small holes or sawdust piles. | Splash a little water on a sunny spot. If it beads up, your sealant is good. If it soaks in, it's time to reseal. |
| Fall | Examine all caulking around windows, doors, and trim for cracks or gaps. Ensure gutters and downspouts are completely clear of debris. | A small handheld mirror can help you inspect the underside of window sills and overhangs for failing caulk. |
| Winter | Perform a quick visual check after major storms. Look for any new, obvious damage from wind, ice, or debris. | Keep shrubs and tree branches trimmed back at least 12 inches from the siding to prevent moisture build-up and physical damage. |
By making this seasonal check a habit, you're not just maintaining your siding—you're protecting the value and structural health of your entire home. You'll catch issues when they're small, easy fixes, ensuring your cedar looks beautiful for years to come.
Getting Your Cedar Siding Clean the Right Way
Cleaning is the most critical part of keeping your cedar siding in top shape. We're not just talking about making it look good; we're talking about getting rid of the nasty stuff—mildew, algae, and road grime—that holds moisture against the wood and leads to rot. A good, thorough cleaning sets the stage for a new coat of stain, making sure it soaks in deep and does its job.
This is one of those jobs where more power is definitely not better. I’ve seen homeowners blast their siding with a high-PSI pressure washer, and it's one of the quickest ways to cause permanent damage. You can literally scar the wood or drive water so deep into the fibers that it causes problems for years. Gentle and methodical is the only way to go.
The Best Approach: A Gentle, Soft-Brush Wash
For most yearly clean-ups, you really don’t need anything fancy. A bucket, a mild cleaning solution, a soft-bristle brush on a pole, and your garden hose are your best friends here. This simple method is hands-down the safest way to lift off surface dirt and pollen without roughing up the wood.
You can even mix your own cleaning solution. Just combine about a gallon of water with a quarter-cup of a gentle, pH-neutral soap. Steer clear of harsh detergents or anything with ammonia, as they can strip the natural oils right out of the cedar.
My advice is to work in small, manageable sections. Always start at the bottom and work your way up to avoid creating "clean streaks" down the dirty siding. Give the surface a light scrub with your brush, then rinse it thoroughly from the top down before the soap has a chance to dry.
How to Deal With Stubborn Mildew
If you spotted dark specks or a greenish film during your inspection, you've got mildew. It’s incredibly common, especially in damp climates like ours, and a simple soap-and-water wash isn't going to cut it. This is where people often make a huge mistake and grab the chlorine bleach.
Crucial Trade Secret: Never, ever use chlorine bleach on cedar siding. It will kill the mildew, sure, but it also destroys the wood's lignin—the natural glue holding the wood fibers together. This leaves the surface weak and brittle, and it won't hold a new coat of stain properly.
Instead, do what the pros do: use an oxygen bleach solution. It's a powder you mix with water, and it's fantastic because it kills mildew and algae without damaging the wood itself. You can usually find it at any hardware store. I like to use a pump sprayer to apply it—it makes the job much easier.
Here’s the process for getting rid of mildew for good:
- Prep the Area: First, wet the affected siding down with plain water from your hose. This keeps the wood from soaking up the cleaning solution too quickly and lets it work on the surface where the mildew is.
- Apply the Solution: Spray your oxygen bleach mixture onto the mildewed spots, again working from the bottom up.
- Give It Time: Let the solution sit and do its thing for about 10-15 minutes. You should see it start to bubble a bit as it lifts the grime and kills the spores. Just don't let it dry on the siding.
- Scrub and Rinse: Give the area a final light scrub with your soft-bristle brush to loosen any last bits of grime. Then, rinse the entire section completely until every bit of residue is gone.
This professional method tackles the problem at its root without harming your beautiful cedar. In fact, gentle but regular cleaning is a core component of any solid maintenance of cedar siding plan, often followed by sealing to protect against the sun. You can learn more about exterior cedar siding maintenance on datainsightsmarket.com.
Using a Pressure Washer (The Right Way)
While I almost always recommend against it for cedar, I know some people will want to use a pressure washer. If you absolutely must, you can use it carefully for the final rinse—never to blast off the initial dirt.
If you go this route, you have to follow these rules, no exceptions:
- Lowest PSI Possible: Keep the pressure dialed way down, no higher than 500-600 PSI.
- Widest Fan Tip: Use the widest-angle fan tip you have (it’s usually white or green). Never use a narrow or pinpoint jet.
- Keep Your Distance: Hold the nozzle at least 18-24 inches away from the wood at all times. Any closer and you risk causing damage.
Following these steps will leave your siding perfectly clean and prepped for its next protective coat, not scarred and waterlogged.
Getting Your Cedar Siding Stained and Repaired
Alright, you've done the hard part—a thorough inspection and a deep clean have given you the perfect canvas. Now comes the rewarding part: staining and making those small repairs. This is where you give your siding the armor it needs to fend off moisture and harsh UV rays. This is the heart of effective maintenance of cedar siding, turning your prep work into real, long-lasting protection.
Picking out a stain can feel like a huge decision, but it really just comes down to one question: do you want to show off the natural wood grain or go for maximum defense? Your answer will point you straight to the right product.
Selecting the Right Stain or Sealant
The stain aisle can be intimidating, but products generally fall into three camps. Each one strikes a different balance between looks and protection, and knowing the difference is key to getting the result you want.
- Transparent Stains: These are for the purists. They let the cedar's natural beauty shine through with minimal pigment, but they still pack in water repellents and UV blockers. This is a fantastic choice for new or pristine siding where you want that gorgeous grain to be the star. Just know you'll be re-applying it more often, usually every 2-3 years.
- Semi-Transparent Stains: This is the sweet spot for most homeowners and my personal go-to. It adds a beautiful touch of color that really complements the wood grain while offering much better UV protection than a transparent stain. A good semi-transparent product will hold up for 3-5 years, making it a perfect middle-ground.
- Solid Color Stains: If you need maximum protection or want a uniform, paint-like finish, a solid stain is the answer. It completely covers the wood grain, forming a thick, protective film over the surface. This is your longest-lasting option—often 5-7 years—and it’s brilliant for older siding that has a few imperfections to hide.
A little advice from experience: your choice of stain really sets the stage for future maintenance. A semi-transparent stain lets the wood breathe and fades gracefully over time, making it much easier to prep and re-coat. A solid stain, on the other hand, can eventually peel like paint, which means a whole lot more scraping and sanding down the road.
Pro Application Tips for a Flawless Finish
Once you've got your stain, how you put it on is what separates a DIY job from a professional one. The goal is a perfectly uniform coat with no drips, no runs, and absolutely no ugly lap marks where your strokes overlap.
One of the best techniques in the business is called back-brushing. Even if you're using a sprayer to get the stain on the wall quickly, you need to follow it up immediately with a high-quality brush. The process is simple: one person sprays a small section, and another follows right behind, using a brush to work the stain deep into the wood grain.
This two-step method is non-negotiable for a few reasons:
- It Guarantees Deep Penetration: Brushing physically forces the stain into every last pore and crevice of the wood, which creates a much stronger bond and a better seal.
- It Prevents Lap Marks: The brush smooths everything out, blending each section seamlessly into the next.
- It Catches Drips and Runs: You're smoothing out any excess stain before it even has a chance to run down the wall.
Always work with the wood grain, never against it. Try to stain a few boards at a time, moving from one end all the way to the other without stopping. Applying the stain "wet-on-wet" is the secret to avoiding those tell-tale lap marks. To get a sense of the quality you're aiming for, take a look at this example of Breeze Siding's finished work.
Tackling Common Cedar Siding Repairs
Even with the best maintenance, life happens. A stray baseball, a determined woodpecker—it’s crucial to jump on these small issues quickly before they become big problems that let water sneak in behind your siding.
The real mark of a good repair is that you can't see it. You want the patch to blend so perfectly with the surrounding boards that no one would ever know it was there.
Replacing a Single Damaged Board
Getting one bad board out without messing up its neighbors sounds tough, but it's very doable. The trick is to take a hammer and a sharp chisel and carefully split the damaged board right down the middle, lengthwise. This relieves the pressure, letting you pry the pieces out without breaking the tongue-and-groove joints of the boards above and below.
With the old board gone, take your new replacement board and use a sharp utility knife to slice off the back of the groove. This lets it slip neatly into place over the tongue of the board below it. Use stainless steel siding nails to blind-nail the top edge (it'll be hidden by the board above it) and then face-nail the bottom.
Filling Minor Holes and Gouges
For smaller things like woodpecker holes or deep dings, a two-part epoxy wood filler is what the pros use. Forget standard wood putty that shrinks and cracks over time. A good exterior-grade epoxy creates a waterproof, rock-solid patch that essentially becomes part of the wood.
Here’s how to make a repair disappear:
- Clean It Out: Use a small pick or screwdriver to dig out any loose, rotted wood from the hole. You need a solid base for the filler to stick to.
- Mix and Apply: Mix the two parts of the epoxy exactly as the directions say. Press it firmly into the hole, overfilling it just a bit to allow for sanding.
- Sand It Flush: Once the epoxy is fully cured (don't rush it!), use sandpaper to carefully sand the patch down until it’s perfectly smooth and level with the siding.
- Prime and Finish: Dab the patch with a quality exterior primer, then touch it up with your matching stain. If you take your time, the repair will be completely invisible.
Knowing When to Repair vs. Replace Your Siding
Every homeowner with cedar siding eventually hits a crossroads: is it time for a few targeted repairs, or is a full-on replacement the smarter move? Making the right call is about more than just looks; it's a financial decision that can save you a ton of money and headaches down the road while protecting your home's structure. Diligent maintenance can keep cedar going for decades, but eventually, you'll reach a point where just patching things up isn't a sustainable strategy.
The decision usually comes down to the scale of the problem. A few warped boards here or a small patch of rot there can almost always be handled with the repair techniques we've covered. But when you start finding the same issues cropping up all over your house, it's time to start thinking bigger.
Clear Signals That Point to Replacement
It's always tempting to just keep patching up old siding, but you have to know when you're fighting a losing battle. If your annual inspections are turning up widespread, systemic problems, a full replacement is almost certainly the most sensible long-term investment. This is especially true here in the Puget Sound, where our notoriously damp climate can really speed up deterioration once the siding's defenses are down.
Here are the undeniable signs that it’s time to stop repairing and start planning for a replacement:
- Widespread Rot: If you're finding soft, spongy wood on more than 20-25% of your home's exterior, you're well past the point of simple fixes. That much rot points to a fundamental failure in the siding's ability to do its primary job: shed water.
- Extreme Brittleness or Cracking: Here's a quick field test I do. Take a utility knife and gently try to flick a tiny sliver of wood from a hidden spot. If the wood is so dry and brittle that it just crumbles into dust, its natural oils and integrity are gone. Siding in this condition is too far gone to properly hold a new coat of stain and will just keep failing.
- Skyrocketing Energy Bills: Have your heating costs been creeping up for no obvious reason? Old, drafty siding is a huge source of energy loss. A full replacement is the perfect opportunity to install a modern, high-performance house wrap, creating an airtight thermal envelope that old siding just can't compete with.
- Maintenance Becomes a Constant Chore: Are you having to caulk, seal, and touch up your siding every single year just to keep it from looking terrible? That’s a clear sign the material itself is at the end of its life. The constant upkeep is costing you time and money that would be better put toward a new, more resilient solution.
The Overlooked Benefits of a Siding Upgrade
Deciding to replace your siding isn't just about fixing what's broken—it’s a major upgrade for your entire home. The benefits go way beyond a fresh look and can deliver a significant return on your investment, which is a huge deal for homeowners in the competitive Seattle real estate market.
A full siding replacement is one of the top exterior remodeling projects for recouping your investment. Homeowners can often expect to recover a substantial portion of the project cost upon resale, thanks to the massive boost in curb appeal and the assurance of a well-protected home.
Thinking about a full replacement opens up possibilities that simple repairs just don't offer. You can dramatically improve your home’s energy efficiency by adding that modern house wrap and even exterior insulation. It’s also the perfect time to switch to superior materials, like pre-finished siding, which comes with a durable, factory-applied coating that drastically cuts down on future maintenance of cedar siding.
Ultimately, a siding replacement gives you a clean slate. You get the peace of mind that comes with a professionally installed, fully sealed exterior that will protect your home and look fantastic for decades—not just until next season's inspection.
A Few Common Questions We Hear About Cedar Siding
Once you've got the basics down for inspecting, cleaning, and repairing your cedar, you're bound to have a few more specific questions. It's only natural. We get calls about these all the time, so let's tackle some of the most common things homeowners wonder about.
Think of this as the "what if" section—a quick guide to those practical details that can make all the difference in keeping your siding in top shape.
How Often Should I Restain My Cedar Siding?
This is probably the number one question we're asked. There's no single magic number, as it really comes down to our local Pacific Northwest climate and how much sun exposure your house gets.
As a general rule of thumb, a good semi-transparent stain will need a fresh coat every 3-5 years. If you've used a solid stain, which offers more protection, you can often push that to 5-7 years.
The best way to tell? Let the wood show you. Grab your garden hose and spray a small area. If the water beads up and rolls right off, your finish is still protecting the wood. If it soaks in and makes the cedar look dark and wet, it’s time to start planning your restaining project. Faded, tired-looking siding is another dead giveaway.
Can I Just Paint My Cedar Siding Instead of Staining It?
You sure can, but it's a decision you'll want to think through carefully. Paint gives you a huge color palette and fantastic UV protection, but it comes at a cost: you'll completely cover up the beautiful, natural grain that makes cedar so special in the first place.
The real catch with paint is the long-term maintenance. Stain tends to fade gracefully over time, making reapplication relatively straightforward. Paint, on the other hand, eventually fails by cracking, peeling, and chipping. That means your prep work for the next paint job will involve a whole lot of scraping and sanding—it's a much bigger job.
If you do go the paint route, using a high-quality, stain-blocking primer is an absolute must. Cedar has natural oils called tannins that will "bleed" through standard paint, leaving yellowish-brown stains on your finish. A good primer stops this from happening.
What’s the Best Way to Fix Small Woodpecker Holes?
Ah, the woodpecker problem. For those pesky holes or any other deep gouges, the go-to solution for pros is a two-part epoxy wood filler made for exterior use. This stuff is incredible—it forms a rock-solid, waterproof patch that essentially becomes one with the wood.
Here’s how you do it:
- First, dig out any loose wood fibers from inside the hole with a small pick or utility knife.
- Next, mix the two parts of the epoxy filler based on the package directions.
- Press the filler firmly into the hole, overfilling it just a little so it’s proud of the surface.
- Once it has completely hardened, sand it down so it’s perfectly smooth and flush with the siding.
Finish it off with a dab of primer and a touch-up with your matching stain or paint, and that hole will be a distant memory.
Is It Worth Hiring a Pro for Siding Maintenance?
Honestly, it depends on the job and your comfort level. For simple annual tasks, like a light cleaning or patching a single small hole, a handy homeowner can absolutely tackle it.
But when you're looking at a bigger project—like restaining the entire house or replacing several boards—calling in a professional is a smart move. A good crew has the right safety gear for working up high, the specialized equipment to prep the surface properly, and the know-how to apply the finish so it looks great and lasts. A pro job often saves you money in the long run by avoiding common DIY mistakes and extending the life of your siding.
If you're in the Seattle area and facing a siding project that feels like a bit too much, or if you just want the peace of mind that comes with an expert job, Breeze Siding is here to help. You can learn more about our professional siding services at our website: https://breezesiding.com.