
If you’re searching for “siding installation contractors near me” in Seattle and surrounding neighborhoods like Capitol Hill, Ballard, Queen Anne, West Seattle or the University District, you’ve come to the right place. Our rain-soaked climate demands crews well-versed in moisture-management methods, from installing high-performance house wrap to creating ventilated rainscreen gaps. Whether your home sits on a steep slope in Magnolia or a historic street in Fremont, the right pros protect your investment and boost curb appeal.
To get you started, here’s a quick rundown of three local teams that consistently deliver top-notch siding replacement projects across Seattle’s diverse neighborhoods.
Top Seattle Siding Contractors Comparison
Think of this as your shortlist. I’ve put together a simple table comparing each company’s specialty, what they typically charge per square foot, and what past customers have to say. It’s the perfect way to quickly see who might be a good fit before you start making calls.
You'll find:
- Each contractor's focus, whether it's a specific material or trade method like rainscreen systems or advanced moisture barriers.
- The average cost per square foot, so you can align with your budget.
- Customer ratings pulled from real-world projects right here in Seattle and nearby suburbs.
This isn’t about picking a winner just from this chart—it’s about narrowing down your options to a manageable few based on location, material expertise, and project scope.
Top Seattle Siding Contractors at a Glance
| Contractor Name | Service Highlights | Average Cost (Per Sq. Ft.) | Customer Rating |
|---|---|---|---|
| Evergreen Exteriors | James Hardie fiber cement specialists, full tear-off | $8.50 | 4.8/5 |
| Rain Shield Remodeling | Vinyl siding experts, moisture barrier upgrades | $6.75 | 4.6/5 |
| Pacific Northwest Siding | Cedar and engineered wood, historic home care | $9.20 | 4.7/5 |
After a quick look, you can likely tell which team might suit your project—whether it’s a modern condo in Belltown needing insulated vinyl or a Craftsman in Ballard seeking cedar shingles with invisible ventilated rainscreen channels.
Use these snapshots as a launchpad. The goal is to pick two or three contractors to call based on your siding material, budget, and neighborhood logistics.
What to Keep in Mind
A few factors will really shape your siding replacement:
- Timeline: Simple repairs or partial updates can take as little as two days, while a full tear-off and re-siding—including substrate repairs—can run 10–14 days.
- Budget: Your cost-per-square-foot estimate should account for premium trade methods like house wrap installation, proper flashing, and ventilation gaps behind siding panels to prevent trapped moisture.
- Materials & Methods: Fiber cement often pairs with a rainscreen system; vinyl benefits from foam-backed insulation panels; cedar needs vertical furring strips for airflow. Choose a crew experienced in your material’s best-practice installation.
Here’s How It Plays Out in the Real World
Sarah, a Ballard homeowner, faced peeling vinyl siding and mold on her Queen Anne-style home. She needed a contractor who knew Seattle’s wet winters inside and out. After comparing pros like those above, she chose Evergreen Exteriors for their James Hardie expertise and rainscreen techniques.
They arrived in six days. First, they applied a premium house wrap and furring strips to allow continuous airflow behind the new panels. The full tear-off, substrate repair, and siding install wrapped up in 12 days, sticking exactly to the $8.50 per square foot average. By next winter, Sarah’s walls stayed crisp and dry—no mold, no warping.
It goes to show: thorough upfront research and proper trade methods make for a smooth, headache-free siding replacement.
Your Next Steps
Now it’s your turn.
- Dive into full profiles of the contractors that caught your eye.
- Confirm they hold a Washington State Contractor License and manufacturer certifications (e.g., James Hardie Preferred Installer).
- Schedule on-site estimates in neighborhoods like West Seattle, Magnolia, or Queen Anne.
Don’t settle for a single quote. Comparing two or three bids helps you evaluate not only prices but communication styles, proposed installation techniques, and how each crew plans around Seattle’s tighter permitting and inspection timelines. This is how you find the right local pro and elevate your home’s look, energy efficiency, and durability.
What to Look for in Seattle Siding Professionals
Finding the right "siding installation contractors near me" in Seattle means looking beyond flashy wraps on trucks. Our damp climate, steep hills, and strict codes demand installers who back up their work with solid credentials and best-practice trade methods.
Begin with the essentials:
- Washington State Contractor License: Proof of legitimacy.
- General Liability Insurance: Shields you from unexpected damage claims.
- Workers’ Compensation: Covers on-site injuries.
Vetting Local Experience And Reputation
An installer who’s handled jobs in Fremont, West Seattle, Ballard or Queen Anne knows how wind-driven rain behaves on a sloped roofline and local code nuances. When vetting candidates, look for:
- A Strong Local Portfolio—Before-and-after photos of homes in your area, showing clean trim alignment, precise flashing details, and properly installed house wrap.
- Transparent Online Reviews—Patterns on Google or Yelp, and how the company resolves concerns about moisture issues or warranty claims.
- Manufacturer Certifications—Badges like James Hardie Preferred Installer or LP SmartSide Certified Pro ensure your siding warranty stays intact.
Pro Tip: Ask for recent project addresses and drive by. Inspect how the siding panels lap, how the trim meets corners, and whether gutters and downspouts integrate neatly.
Understanding Warranties And Permit Handling
A top-tier crew will supply a written workmanship warranty—separate from the siding manufacturer’s guarantee—to cover installation hiccups like leaks or misaligned panels. They’ll also manage Seattle’s permit process so you avoid fines or delays.
With the global siding market at $56.84 billion in 2024 and projected to reach $76.26 billion by 2029, partnering with a detail-oriented, fully compliant contractor is more important than ever. Get more insights on the siding and decking market trends from this report.
Comparing Siding Materials for Your Northwest Home
Choosing the right material is as vital as finding the best crew. Seattle’s damp climate means your siding dictates curb appeal, maintenance needs, and how well your walls fend off moisture. Let’s explore the top choices.
The big three are fiber cement, vinyl, and cedar—each with unique performance and aesthetic traits in the Pacific Northwest.
Fiber Cement: The Northwest Workhorse
Fiber cement, especially James Hardie panels, stands up to rot, pests, and fire. A blend of cement, sand, and cellulose fibers provides a stable, non-porous surface that won’t swell or warp. Best-practice installs usually include a rainscreen gap behind the siding to promote airflow and dry-out any incidental moisture.
A Bellevue homeowner’s old vinyl siding had trapped water, leading to hidden mold. Switching to fiber cement with a ventilated rainscreen and premium house wrap cured the issue for good.
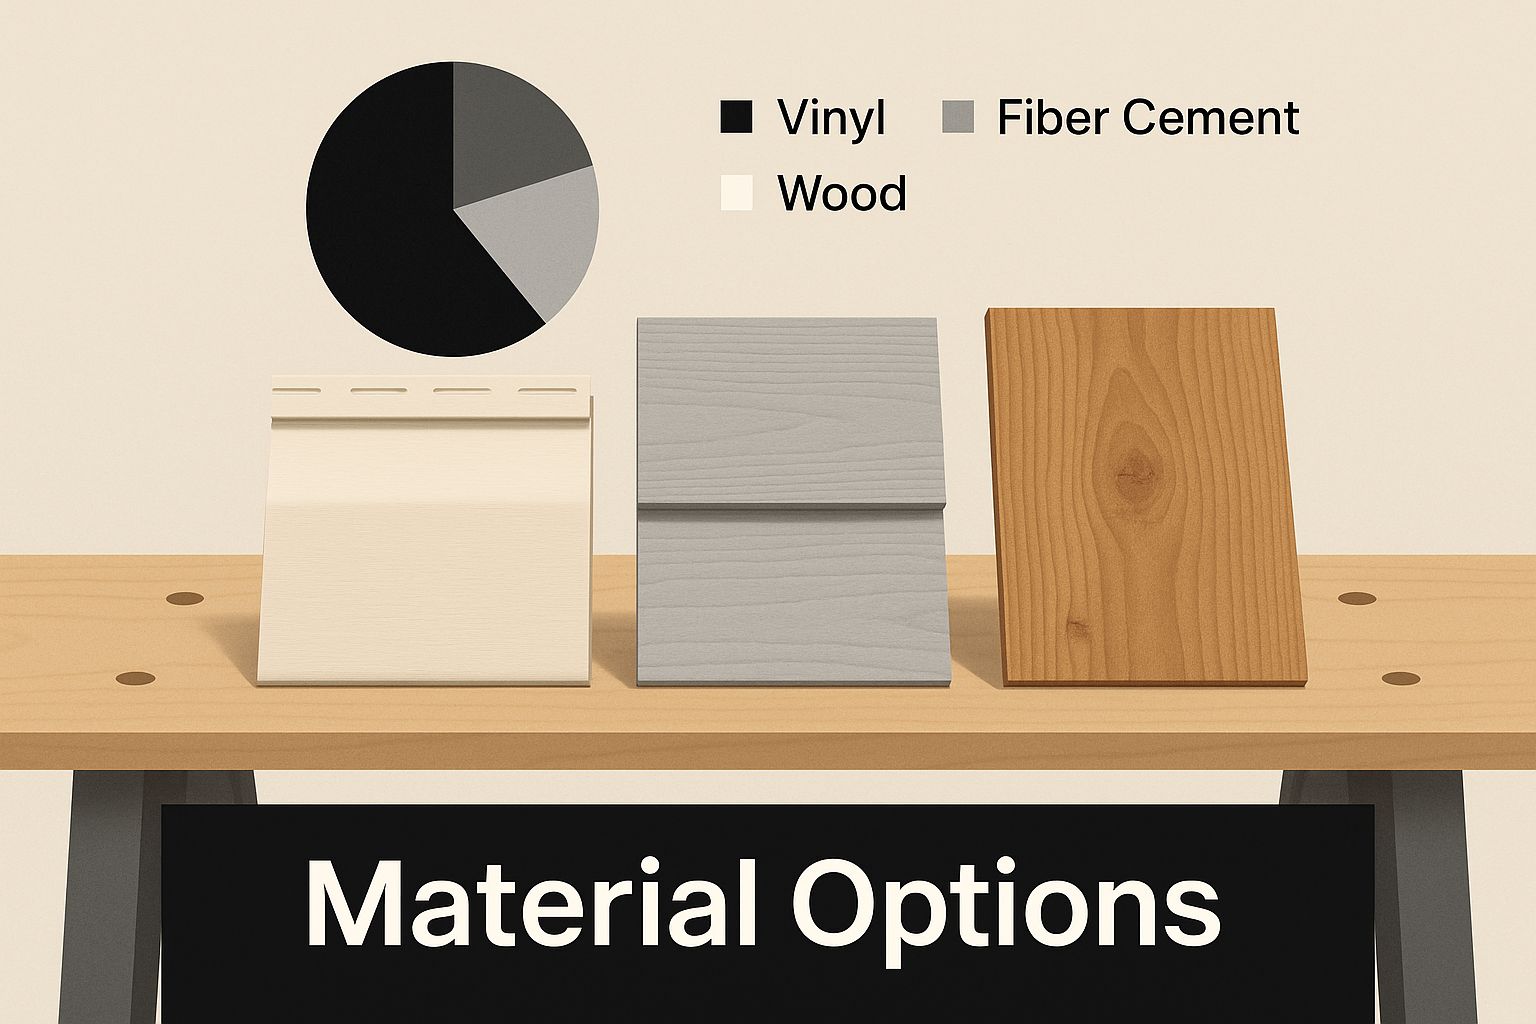
Vinyl Siding: The Budget-Friendly Choice
Vinyl wins on cost and low maintenance—no painting, just the occasional power-wash. Insulated vinyl options boost energy efficiency, cutting heating bills during chilly months. Vinyl commands about 54% of the global market thanks to its affordability.
But low cost can hide lower trade standards. Without proper house wrap, flashing, and tight panel overlaps, moisture can sneak behind and rot your sheathing. Always verify the installer uses a high-grade moisture barrier and precise nailing patterns to maintain warranty coverage.
Dig into more about the siding market's growth and trends.
Cedar Siding: The Classic Look
Natural cedar offers unmatched beauty and inherent resistance to insects and decay. The trade secret is installing cedar over furring strips to allow airflow and prevent moisture buildup. With proper finish coatings and re-staining every three to five years, cedar homes maintain that warm, rustic Northwest charm.
Keep in mind: neglecting re-staining leads to that silvery gray patina—and invites decay if moisture sits on untreated wood.
Getting Accurate Bids And Understanding Contracts
Comparing siding estimates can feel like a maze. A clear bid breaks down material costs, labor hours, permit fees, and waste removal. When each line item is spelled out, you avoid surprises.
Watch for differences in scope: one quote might include debris hauling, another might add it as a separate fee. Confirm that the bid details:
- Unit prices for each material
- Labor as hours or flat square-foot rates
- Permit fees matching Seattle’s actual costs
- Dumpster, debris hauling, and site cleanup coverage
Beware of bids that undercut local averages. A too-good-to-be-true price often means rushed work, skipped moisture barriers, or surprise change orders.
Decoding Contract Terms
Dig into warranty fine print. Know if workmanship coverage includes water intrusion or just cosmetic flaws. Ask:
- Can I see a full material breakdown, line by line?
- What are the projected dates for demolition, installation, and inspection?
- Who handles permit pulls, city inspections, and final sign-offs?
| Item | Check | Notes |
|---|---|---|
| Itemized Materials | ✔ | Confirm unit prices |
| Labor Hours | ✔ | Hourly vs. flat rate clarification |
| Permit Fees | ✔ | Should align with city costs |
| Waste Removal | ✔ | Covered or extra cost? |
| Warranty Details | ✔ | Verify coverage period and scope |
With this checklist, side-by-side bid comparisons get easier—and you’ll pick the right siding pro without second-guessing.
What to Expect During Siding Installation

Knowing the installation flow keeps things smooth. Once materials arrive, crews transform your property into a well-organized work zone.
The Installation Flow
- Prep Work: Crews protect landscaping with tarps, set up material staging near your driveway, and confirm final panel colors, trim details, and flashing locations.
- Tear-Off: Old siding comes off, revealing the substrate. Installers inspect for rot or water damage—essential before any new siding goes up.
- Substrate Repair: Any affected sheathing is replaced. Properly curing and sealing this layer is a non-negotiable best practice to prevent future structural issues.
- Moisture-Management Layer: Premium house wrap goes on, followed by furring strips to create a rainscreen gap. This extra step accelerates drying and extends siding life.
- New Siding Installation: Panels, trim, and flashing are installed with precision. You’ll see your home’s new look emerge panel by panel, with crisp corners and uniform reveal spacing.
A quick five-minute daily check-in with the crew leader helps catch minor misalignments early, saving rework time.
When finished, the team handles a thorough cleanup. Then you walk the job with them, confirming every detail meets your expectations and local code.
Your Top Siding Questions Answered
Seattle homeowners often have similar concerns. Let’s clear them up so you can plan your siding project confidently.
What’s the Best Time of Year for a Siding Replacement?
Late spring through early fall—May through October—is ideal to avoid our unpredictable downpours. That said, top crews use advanced moisture-control methods to work around wet weather, offering year-round installation windows.
How Long Does a Siding Project Actually Take?
Expect about 10 to 14 days for a full tear-off and replacement on a typical Seattle home. Hidden rot repairs or specialty siding patterns can add a few days. Crew size, access constraints in neighborhoods like Queen Anne or Capitol Hill, and material availability also play roles.
Pro Tip: Ensure your contractor inspects sheathing right after tear-off. Catching rot early is essential to avoid major structural headaches later.
Do I Really Need a Permit to Re-Side My House?
Yes. Seattle and most nearby municipalities require permits for full siding replacements, especially if the scope includes sheathing repairs or structural work. A professional contractor will handle all permit pulls, inspections, and sign-offs, saving you paperwork, potential fines, and project delays.
Ready to see what a durable, beautiful new exterior could do for your Seattle home? The team at Breeze Siding has the local expertise, trade methods, and attention to detail you need. From moisture-management best practices to precise trim alignment, we cover it all.
Get your free, no-obligation estimate today and let’s start the conversation.